After four years with Arch Linux in my workstation computer, I switched back to Ubuntu desktop (for one more time).
Arch Linux is an amazing rock solid Linux distribution and it offers the best documentation by far. However, I moved to Ubuntu 16.04 LTS (Long Term Support) mainly for these reasons:
- I want to spend less time to manage my workstation computer (updates are “pain” in Arch, but very easy in Debian/Ubuntu).
- I have transferred ALL MY DATA to cloud during last 12 months (basically in Google Drive). I am working many hours with Android in mobile devices, so my desktop workstation can have a more simple setup.
- I have transferred ALL MY SERVER APPLICATIONS (apache, php, mysql, postgres) to a Debian VPS, so my desktop workstation can have a more simple setup.
Here is my workstation computer hardware configuration:
- Motherboard GIGABYTE Z68AP-D3, socket 1155, DDR3
- CPU Intel I7 INTEL CPU Core i7-2700K, BX80623I72700K
- RAM (16 GB) KINGSTON KHX1600C9AD3B1/4G, HyperX Blu DDR3, 1600MHz x 4
- Display adapter NVIDIA ASUS ENGTX550 TI DC/DI/1GD5, 1024MB, GDDR
- SSD INTEL 540S SERIES SSDSC2KW240H6X1 240GB 2.5” SATA3 TLC SINGLE PACK (S.M.A.R.T. enabled)
- LG W2453SQ 24 LCD Monitor (1920 x 1080)
- UPS APC Back UPS BR1500GI RS 1500VA (LI)
Ubuntu desktop seems to be much more mature and stable in version 16.04 (latest LTS version). The final result is a Free and Open Source workstation environment, which can meet the requirements of the vast majority of users.
Software installation in Ubuntu can be performed using command line
sudo apt-get install package_name
or using graphic utilities (“Synaptic” or “Software center”). See details in this post. In this tutorial I use the first method.
My goal is to create a Simple And Functional Linux Desktop.
REMARKS
- you will not find information on setup server applications like apache, php, mysql etc in this article. If you are interested on this software, please see this post.
- in this article I also describe the software I use for software development. If you are not interested on this kind of software, please skip relevant sections.
Basic setup
Ubuntu desktop setup is a simple graphical procedure. Download Ubuntu desktop here. Insert the CD (or the USB) and follow the instructions. Setup will only ask for your name and password and disk partitioning. Everything else is a graphical “wizard”.
Main system user
Username and password you provide during default setup will be used to create the main user of your system. This user will be automatically added to sudoers group (users with “administration privileges”).
By default, the root account password is locked in
Ubuntu. So, to execute admin tasks you have to use
sudo. For example:
sudo apt-get install package_name
Disk Partitions
You may let Ubuntu to decide for your disk(s) partitioning or to define it manually, as in my case.
I use ext4 file system for system and data partitions.
My computer has one SSD disk 240 GB, so I used the following structure.
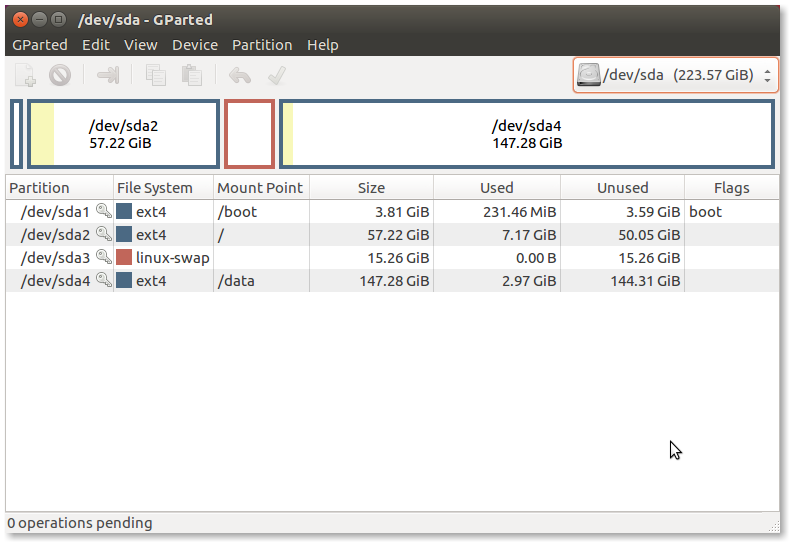
The first partition I defined is the /boot partition (mount point /boot) and the second is the root partition (mount point /). It is strongly recommended to define a swap partition. As a rule of thumb set the double size of your computer RAM. It is recommended (but not required) to have a separate boot partition.
These three partitions are dedicated to Operating System files. So, I have defined one more partition, just to write data. This is the data partition (mount point /data). The obvious advantage of having a data partition is you can format the system partitions and install a new Operating System without affecting your data.
After completing the Basic setup
When setup finishes, you have a working system, covering all of your basic needs.
The default graphical enviroment of Ubuntu is called Unity. It looks like Gnome, but created by Canonical (the company behind Ubuntu) specifically for Ubuntu. You can also install other desktop environments (eg KDE or XFCE etc). DO NOT DO IT! (imho). If you want another environment, install a different Ubuntu flavor (there are many), eg Kubuntu, Xubuntu etc. Do not make major changes in Ubuntu, if you want a stable and easily upgradeable desktop environment (imho always).
You will not find a START MENU in Ubuntu Unity, as in many other graphical environments (Linux or Microsoft Windows).
Some applications shortcuts are already in the Unity Launcher (the button bar in the left of the desktop).

You can launch any application using Ubuntu Unity Dash (see image). Open Dash (click the top button of the Launcher or press SUPER key) and type some letters of the name of the application. For example, to open a terminal:
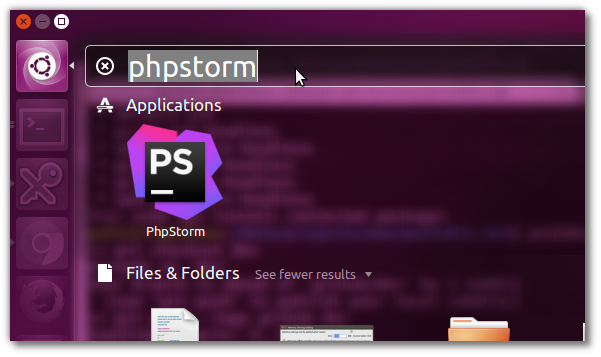
You can move application shortcuts from the Dash to Launcher (drag and drop). You can “Unlock” an application from the Launcher using “Right Click → Unlock from Launcher”.
The HUD or Heads Up Display is a search-based alternative to traditional menus. To open the HUD tap ALT. With HUD you can directly select a menu option of the running application without navigating to menu hierarchy, something like a “Command Palette”.

Press and Hold the “SUPER” key to display Useful keyboard shortcuts.
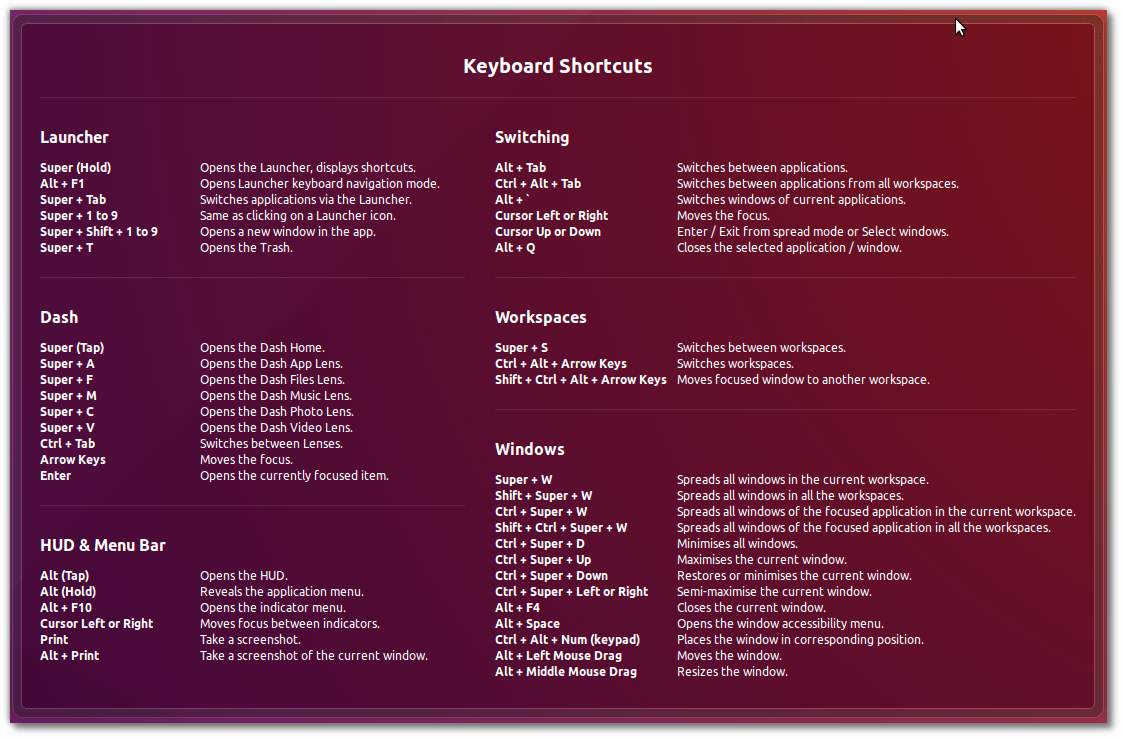
Example:
- SUPER → to open the Dash
- CTRL+ALT+T → to open the Terminal
Many applications are preinstalled in Ubuntu. Some of them are:
- Nautilus file manager
- Gnome Terminal
- Firefox web browser
- Gedit text editor
- LibreOffice (office suite)
- Gnome Image Viewer
- Gnome Screenshot
You can find documentation at help.ubuntu.com. And of course, always remember, Google is your “friend”.
Next steps
Next steps include:
- Update System
- Tweak SSD drive
- Tweak Command Line Environment
- Install more Command Line applications
- Programming Languages
- Tweak Desktop Graphical Environment
- Install more Graphical applications
- Install Web Development software
- Setup peripherals
- Cloud integration
- Recovery mode
- Backup your workstation
Update System
The first thing you have to do after Basic setup is to update your system.
Using the Dash launch “Software updater” (recommended)
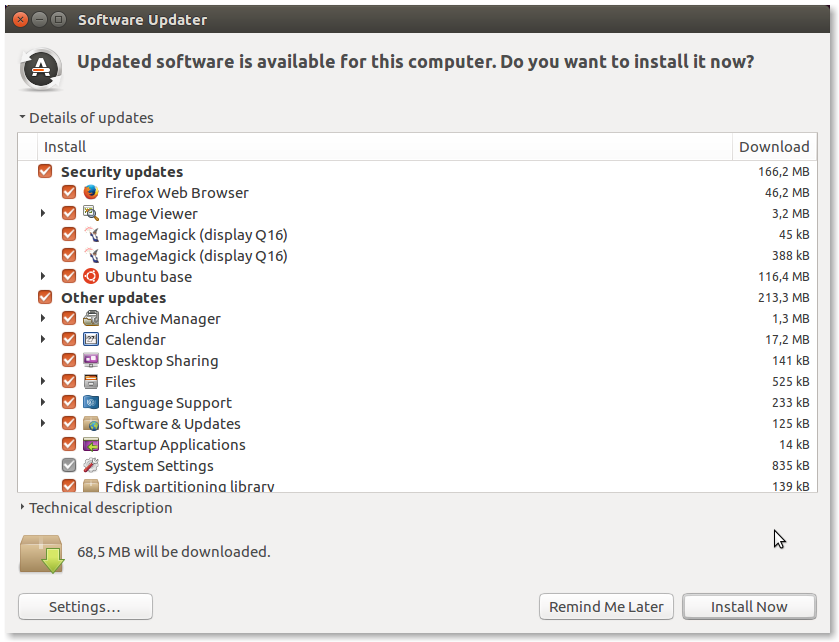
or open a terminal and type
sudo apt-get update && sudo apt-get -V upgrade
Tweak SSD drive
Ubuntu 16.04 seems to be ready for SSD drives. There are some steps you should take to extend the life of your SSD drive. The keypoint is to reduce write actions. Read this post for details.
Tweak Command Line Environment
This section is optional.
Base system includes a lot of command line tools (GNU or other). To run these programs, first launch a Terminal. The most important command line tools are:
- Text editors: nano (which I use in this tutorial) and the famous vi editor
- The Debian package manager apt
- cp (copy), mv (move – rename), rm (delete) files
- ls list files
- Archiving utility tar
- Compression utility gzip
- Remote operations utilities (OpenSSH project) like ssh, scp, and sftp.
- Download utility wget
- File search utility locate
Set default text editor
nano in my case:
sudo update-alternatives --config editor
result:
There are 5 choices for the alternative editor (providing /usr/bin/editor).

  Selection    Path                Priority   Status
------------------------------------------------------------
  0            /usr/bin/vim.gnome   60        auto mode
  1            /bin/ed             -100       manual mode
* 2            /bin/nano            40        manual mode
  3            /usr/bin/mcedit      25        manual mode
  4            /usr/bin/vim.gnome   60        manual mode
  5            /usr/bin/vim.tiny    10        manual mode

Press <enter> to keep the current choice[*], or type selection number:
Customize nano editor
With your favorite text editor (nano in my case), edit the configuration file:
sudo nano /etc/nanorc
Show line numbers
Find #set constantshow and uncomment this line
...
set constantshow
## (The old form, 'const', is deprecated.)
...
Set tab size
...
set tabsize 4
...
Use SSH key authentication
To connect to a remote computer using SSH, you have to give a command like:
ssh RemoteHost -l username
Then you will be prompted for the password. If you do not want to type the password each time you want to connect, you may use “SSH key authentication”, which is more secure method.
Create your keys:
ssh-keygen -t rsa -b 4096 -C "youremail"
(Remember to use a strong passphrase)
Then copy your public key to RemoteServer
ssh-copy-id -i ~/.ssh/id_rsa.pub RemoteServer
Since then, every time you connect using ssh, you will not be asked for a password. The first time (only) you will be asked for the passphrase.
SSH autocompletion
SSH autocompletion is very useful but Ubuntu sets by default HashKnownHosts yes in /etc/ssh/ssh_config. Set to HashKnownHosts no
Install more Command Line applications
This section is optional.
Ntp (Network Time Protocol)
Installing ntp your computer clock can be synchronized with time servers. On Ubuntu, this is done by synchronizing with ntpdate tool.
So, there is no need to install ntp on Ubuntu. However, if you want to install it:
sudo apt-get install ntp
Midnight Commander (mc)
Midnight Commander is a powerful file manager (local, remote and cloud files). Probably the most popular command line file manager in Linux world.
sudo apt-get install mc
htop
htop is an interactive process viewer for Unix.
sudo apt-get install htop
iftop
You can use iftop to display bandwidth usage on an interface.
sudo apt-get install iftop
Openssh-server
If you want to be connected with your workstation from command line using ssh (e.g. from another computer in your LAN), install:
sudo apt-get install openssh-server
Examples
Secure Connect to your computer remotely:
ssh xxx.xxx.x.x -l username (xxx.xxx.x.x is the IP address)
Secure Copy a file remotely:
scp username@xxx.xxx.x.x:/path/to/remote /path/to/local
Harden SSH
Edit SSH configuration:
sudo nano /etc/ssh/sshd_config
Make the following changes:
...
PermitRootLogin no
...
X11Forwarding no
...
AllowUsers yourusername ...
...
Restart SSH
sudo systemctl restart ssh.service
Samba server and client
If you want to be connected with your workstation either from command line or your File Manager (e.g. from another computer in your LAN, Linux, Windows or Mac), install Samba.
Read details in this post: How To Setup Samba on Ubuntu Workstation
p7zip
p7zip is a port of 7z for POSIX systems like Unix (Linux, Solaris etc).
7z is an Excellent archiving software offering High compression ratio and Strong AES-256 encryption.
sudo apt-get install p7zip-full p7zip-rar
Find more information and examples at this post: Easily Compress and/or Encrypt Files in Linux Using 7z (p7zip) Archiver
unrar
This is an utility to extract rar files
sudo apt-get install unrar
wipe
Wipe is useful to secure delete files.
sudo apt-get install wipe
For integration (will add an option to right-click menu) with Nautilus file manager (recommended):
sudo apt-get install nautilus-wipe
Programming Languages
This section is optional.
After Basic Ubuntu setup, the following programming languages are installed:
Install Java (Oracle JDK 8)
To install Java, see this post: How To Setup Java on Ubuntu 16.04.
Tweak Desktop Graphical Environment
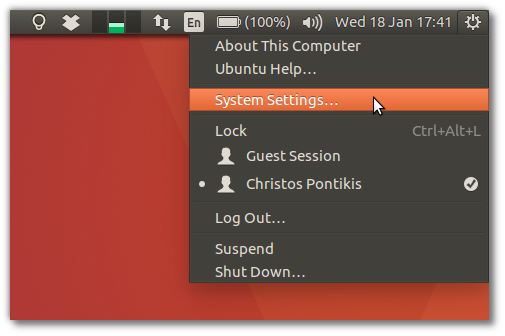
Ubuntu settings are available from Top Right menu:
There are a lot of settings you can modify to tweak your system:

Additional tools
The following graphical tools are available to tweak Desktop environment
-
dconf Editor (low-level configuration system)
sudo apt-get install dconf-tools
-
Unity tweak tool (settings manager for the Unity desktop)
sudo apt-get install unity-tweak-tool
-
Compiz config settings manager (settings manager for Compiz OpenGL compositing window manager)
sudo apt-get install compizconfig-settings-manager
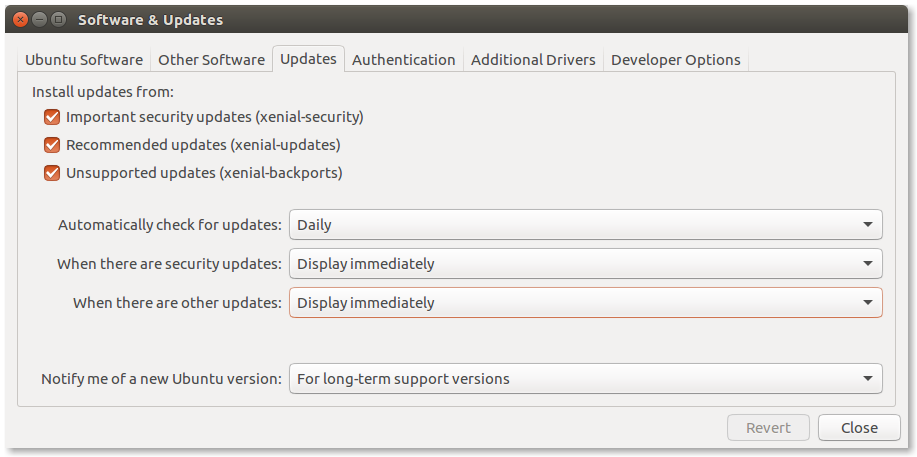
System Updates Settings
Select “Software & Updates” from “System Settings” and go to tab “Updates”
The default setting is “Automatic Download and Install Updates”. Set package updates to “Notify”:
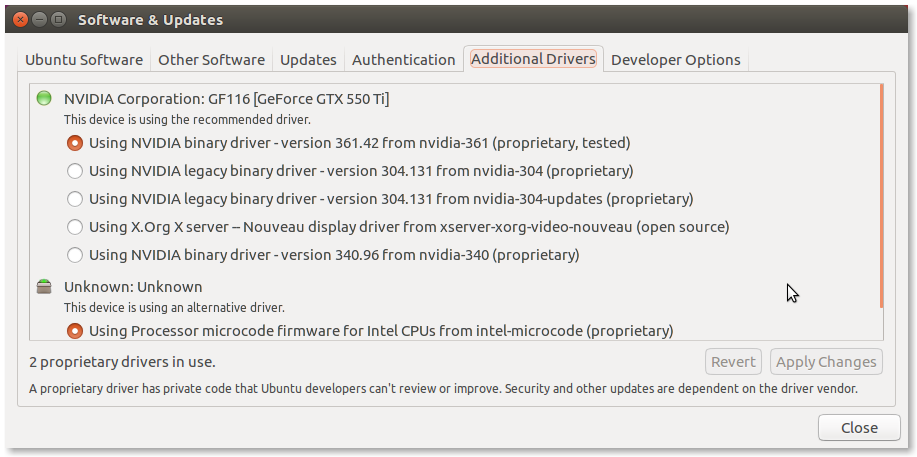
NVIDIA Drivers
Select “Software & Updates” from “System Settings” and go to tab “Additional Drivers”
Change nouveau to NVIDIA:
Mouse Sensitivity
After installation of Ubuntu Desktop 16.04, mouse is very sensitive (practically unusable) in most systems with wireless mouse. To fix this issue, read this post: Fix Mouse Sensitivity in Ubuntu 16.04
Appearance
Select “Appearance” from “System Settings” and go to first tab “Look”
first tab (“Look”)
Here you can select Wallpaper and Theme.
second tab (“Behavior”)
My prererences are
- Show menus for a window → in the window’s title bar
- Enable workpsaces
Language support
Select “Language support” from “System Settings”. Your system will be checked automatically. You will get the message “Some translations or writing aids available for your chosen languages are not installed yet. Do you want to install them now?”
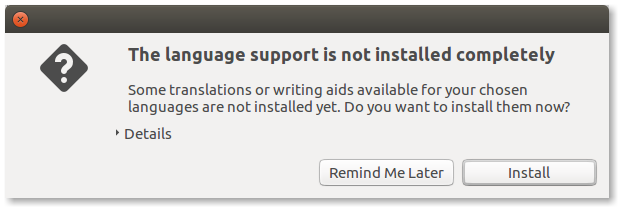
Select “Install”, so missing packages will be installed. In my case:
hyphen-en-gb
libreoffice-l10n-en-za
libreoffice-l10n-el
thunderbird-locale-el
language-pack-el
language-pack-gnome-el
hunspell-en-za
libreoffice-help-en-gb
hunspell-el
firefox-locale-el
libreoffice-help-el
fonts-mgopen
mythes-en-au
hunspell-en-gb
thunderbird-locale-en-gb
hunspell-en-au
hyphen-el
libreoffice-l10n-en-gb
hunspell-en-ca
Text Entry
Select “Text Entry” from “System Settings”.
I modified the shortcut for changing keyboard layout (change language) to ALT+SHIFT instead of (the default) SUPER+SPACE
Default applications
Select “Details” from “System Settings”. Then, define your Default applications.
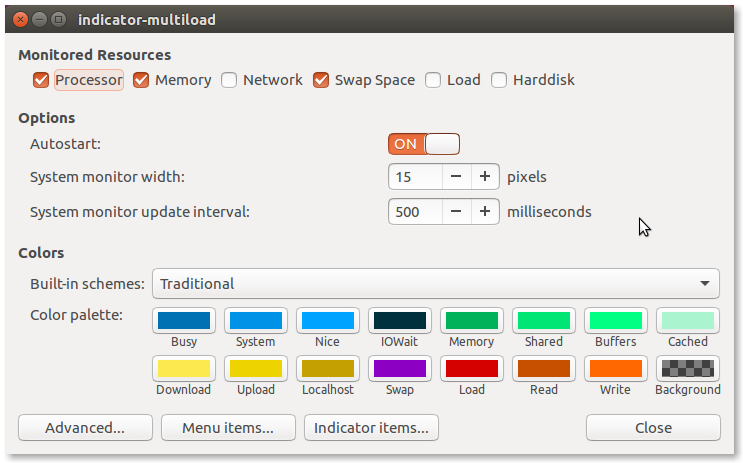
System Load Indicator (indicator-multiload)
System Load Indicator provides real time information for System Load and Performance of your computer. To install it:
sudo apt-get install indicator-multiload
Launch this indicator from the Dash after installation. indicator-multiload will appear in the top bar. Select “Preferences” from the Right-click menu to customize it:
Tweak Nautilus File Manager (Files)
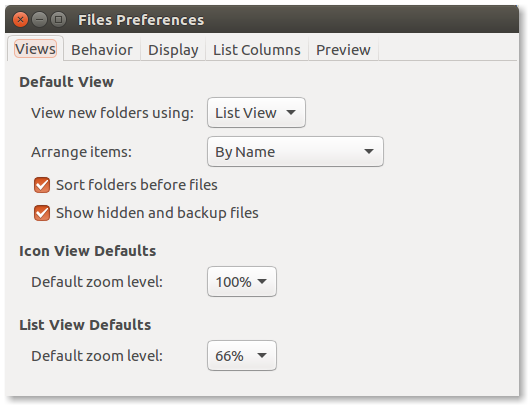
Define Views
Nautilus menu → Edit → Preferences → Views (1st tab)
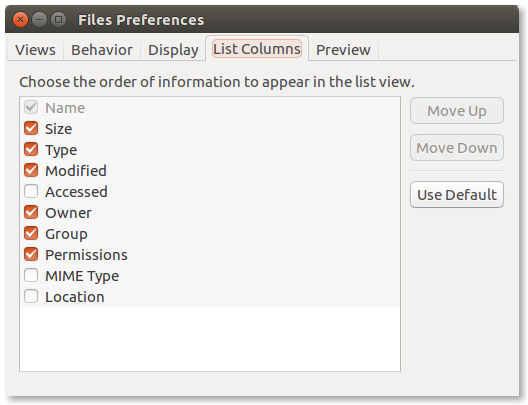
Define visible columns
Nautilus menu → Edit → Preferences → List Columns (4th tab)
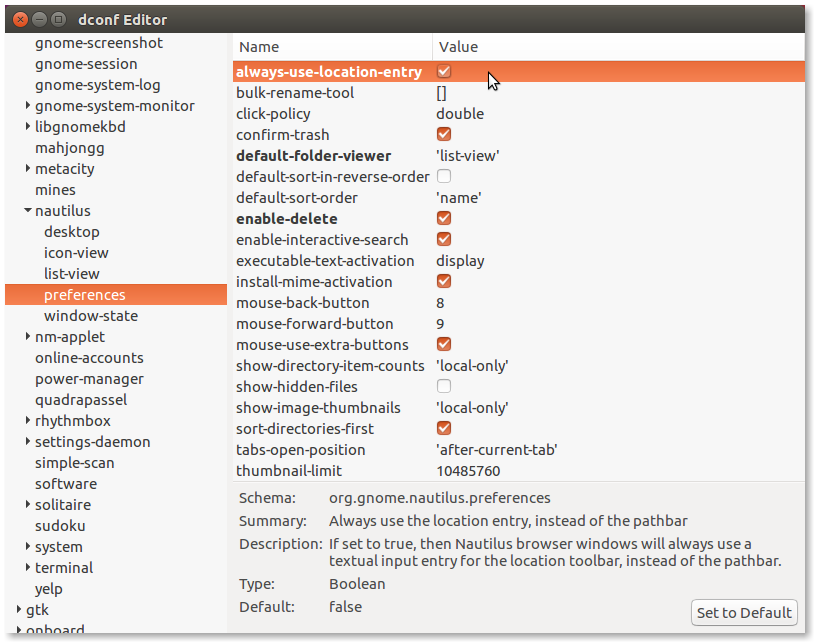
Always use location entry
You can access location entry in Nautilus using CTRL+L. To make it permanent, use dconf Editor:
Org → gnome → nautilus → preferences → always-use-location-entry
remove unwanted default bookmarks in Nautilus
Edit the following files:
nano ~/.config/user-dirs.dirs
and
sudo nano /etc/xdg/user-dirs.defaults
Logout – login to enable the changes you made.
Tweak Gedit (text Editor)
You may add advanced features to Gedit text editor by installing gedit-plugins package. Here is a list of bundled plugins and those shipped with gedit-plugins. I enabled Draw Spaces plugin.
sudo apt-get install gedit-plugins
Microsoft fonts
To install Microsoft fonts, use:
sudo apt-get install ttf-mscorefonts-installer
Tweak Firefox
Firefox is preinstalled in Ubuntu. See this post for detsils: How To Setup And Configure Mozilla Firefox on Ubuntu 16.04.
Tweak Libreoffice
Adding Spell-check for your language is simple.
Select “Language support” from “System Settings”. Ubuntu will check automatically for your language dictionaries and will set them up.
Networking
After default setup you will find Gnome Network Manager in the top bar. Ethernet Network (wired connections) and Wireless Networks (Wi-Fi) are all available there.
Assign static IP address
After default setup your computer will obtain a “fake” IP address automatically, using DHCP. If you want to assign a static IP address:
Top bar → NetworkManager → Edit connections
Then
Ethernet → Wired connection 1 → Edit → IPv4 settings
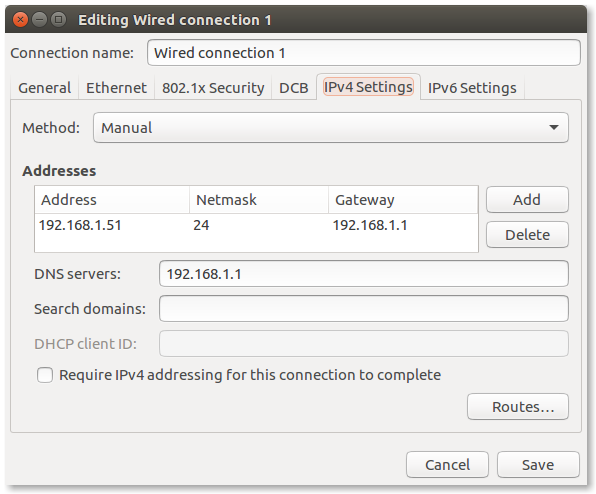
and press Save
Enable the changes you made
Top bar → NetworkManager → Ethernet Network → Disconnect
Then connect again
Top bar → NetworkManager → Ethernet Network → Wired connection 1
Check the changes you made
Top bar → NetworkManager → Connection Information
or using command line:
ifconfig
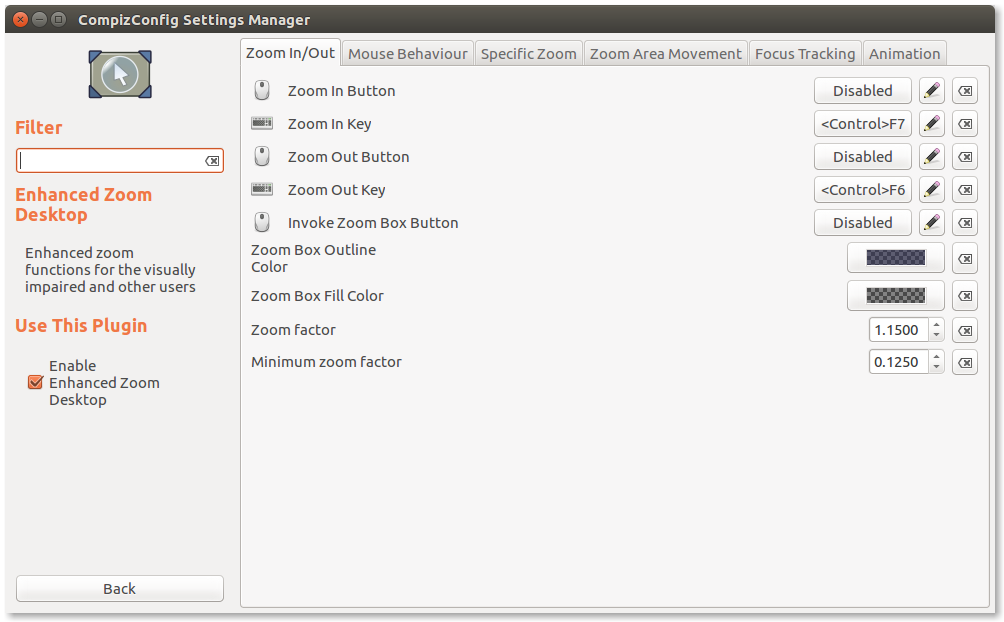
Desktop magnification
Desktop magnification is an accessibility feature. It is also very important, when you create screencast videos. Launch CompizConfig settings manager and Tick the box on
Accesibility → Enhanced Zoom Desktop
Click on Enhanced Zoom Desktop and define Zoom in and Zoom out keys (eg CTRL+F7 and CTRL+F6)
Install more Graphical applications
It is recommended to install software from Repositories, in order to keep your system secure and updated. In some cases this is not possible (some Java applications or software with custom installers). In this case, you have to take care for updates and newer versions of these applications.
Below I mention the software installed in this tutorial without using official or other Ubuntu repositories: Oracle Java, PhpStorm, yed, AEScrypt, Peazip, TeamViewer.
All software is Open Source, except Google Chrome, Dropbox, PhpStorm, Teamviewer. Moreover Dropbox, PhpStorm and Teamviewer are commercial software (Dropbox offers a free plan).
KeePassX
KeePassX password manager is the first application I open after my Linux workstation bootup and the last I close before shutdown. It is strongly recommended to install and use a password manager. Read this post: Manage Your Passwords With KeePass in Linux And Android.
Dropbox
I use Dropbox to synchronize KeePass database in all my devices (computer, laptop, phone, tablet).
sudo apt-get install nautilus-dropbox
Synaptic
Synaptic is a GUI to manage software packages (add – remove software)
sudo apt-get install synaptic
Google Chrome
Read this post: How To Setup And Configure Google Chrome on Ubuntu 16.04.
uget
uGet is an Open Source Download Manager
sudo apt-get install uget
To add support for BitTorrents, install aria2 plugin:
sudo apt-get install aria2
then enable plugin from uGet Settings. Just click Ok in this dialog:
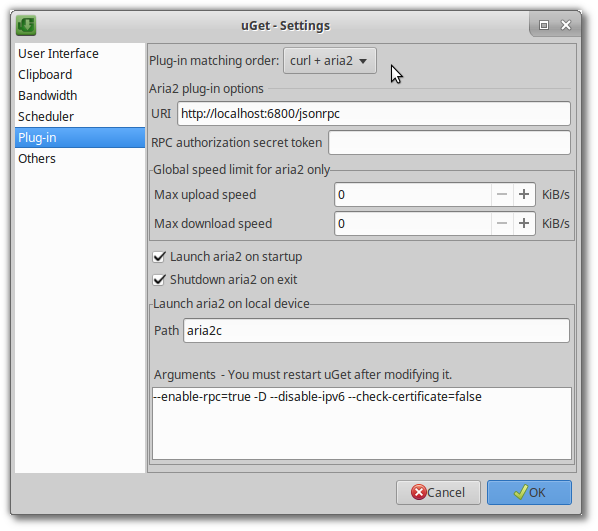
From Settings, set bandwidth limit:
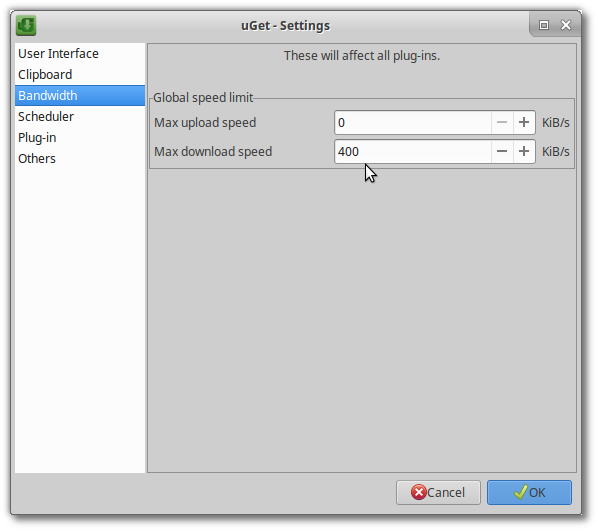
so, the result will be:
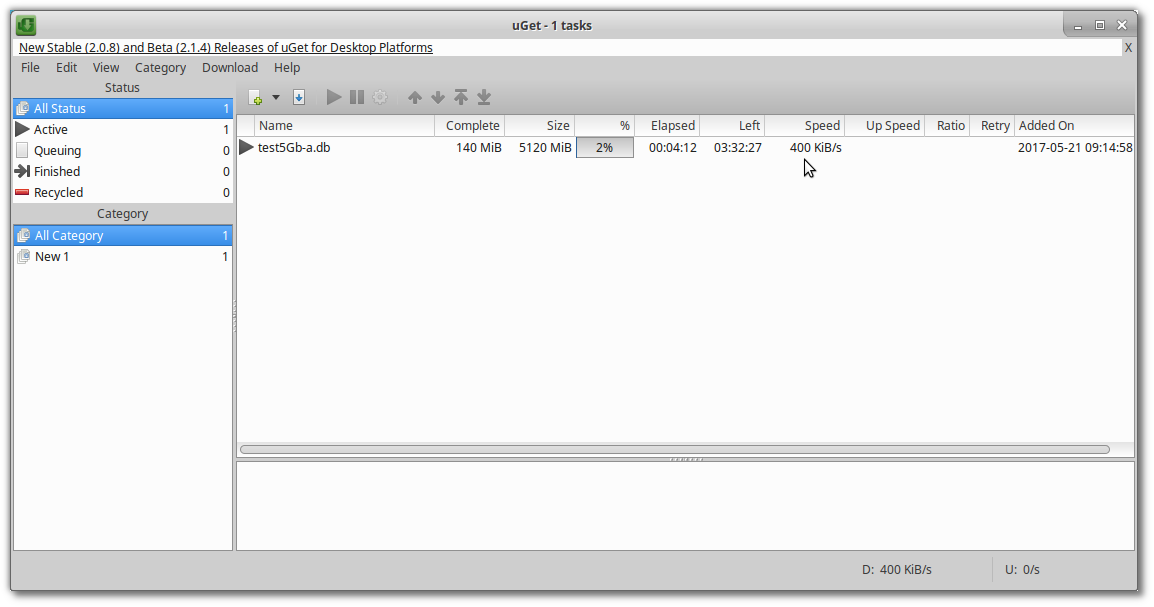
Ubuntu default setup contains Transmission BitTorrent client.
Filezilla
Filezilla is a great FTP client
sudo apt-get install filezilla
Leafpad
Leafpad is a simple text editor (like Notepad in Microsoft Windows)
sudo apt-get install leafpad
Byobu
byobu is a handy terminal multiplexer. Among others, it is very useful when you want to leave a process running after closing your terminal (you cannot do this with the “common” Terminal).
sudo apt-get install byobu
However, there is another reason to install byobu.
purge-old-kernels is a simple bash script, which uses
apt remove --purge command to remove old kernels. It
will be available in your system after installing package byobu.
For more details, read this post: How to Remove Old Kernels
in Debian and Ubuntu.
Terminator
Terminator is a useful tool for arranging terminals.
sudo apt-get install terminator
Gksu
gksu is a library and application used to ask the user for passwords to run programs as root or other user. ATTENTION: use it with caution!
sudo apt-get install gksu
Protect Your Eyes with Redshift
Redshift adjusts the color temperature of your screen according to your surroundings. This may help your eyes hurt less if you are working in front of the screen at night.
sudo apt-get install redshift redshift-gtk
Gimp
Gimp is an advanced image and photo editor. It is the Open Source alternative of Abode PhotoShop.
sudo apt-get install gimp
Single-Window Mode
To change the default multi-window mode, use:
Menu → Windows → Single-Window Mode
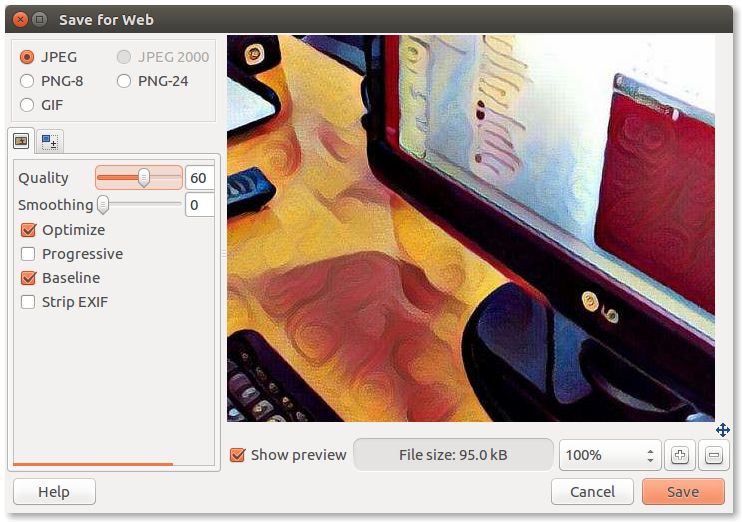
Gimp plugins
Gimp Plugin Registry is a set of Gimp plugins. This will add FX-Foundry menu and Save for Web option in File menu:
sudo apt-get install gimp-plugin-registry
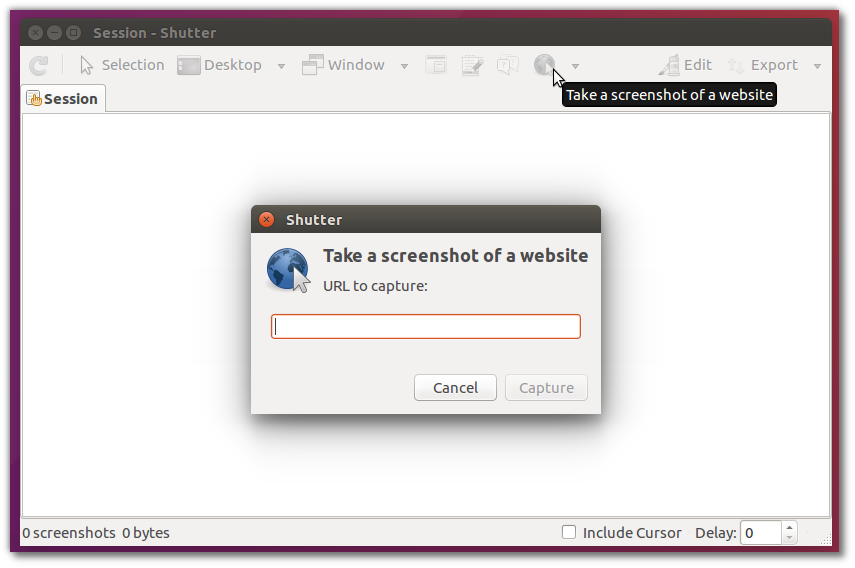
Shutter
Shutter is an advanced screenshot tool.
sudo apt-get install shutter
To capture full webpage screenshots:
sudo apt-get install gnome-web-photo
yEd
yEd is a powerful Java application to generate high-quality diagrams.
Download the installer from https://www.yworks.com/downloads#yEd.
Install extra media codecs
Commonly used media codecs and fonts for Ubuntu. Note: use (*)ubuntu-restricted-extras for other flavors of Ubuntu (eg Xubuntu, Kubuntu etc).
sudo apt-get install ubuntu-restricted-extras
Install Winff
Winff is a Video converter (an FFmpeg GUI).
sudo apt-get install winff
OpenShot
Openshot is an advanced video editor.
sudo apt-get install openshot
Imagination
Imagination is an advanced slide show maker.
sudo apt-get install imagination
Kazam
Kazam is a powerful Screencaster
sudo apt-get install kazam
Audacity
Audacity is an advanced audio editor for multi-track recording and editing.
sudo apt-get install audacity
VLC
VLC is an advanced media player
sudo apt-get install vlc
gscan2pdf
gscan2pdf produces PDF from scanned documents. OCR (Optical Character Recognition) also supported.
sudo apt-get install gscan2pdf
Brasero disk burner
Brasero is a simple but powerful disk burner.
sudo apt-get install brasero
Peazip
PeaZip is an advanced archiver utility, based on Open Source technologies of 7-Zip, p7zip, FreeArc, PAQ, and PEA projects. Secure deleting files also supported.
Download (latest) portable Linux version here.
Create a shortcut to launch Peazip from Dash:
sudo nano /usr/share/applications/Peazip.desktop
add the following (replace /home/pontikis/Apps/peazip_portable-6.1.0.LINUX.x86_64.GTK2/ with your path)
[Desktop Entry]
Name=PeaZip
GenericName=Archiving Tool
Exec=/home/pontikis/Apps/peazip_portable-6.1.0.LINUX.x86_64.GTK2/peazip %F
Icon=/home/pontikis/Apps/peazip_portable-6.1.0.LINUX.x86_64.GTK2/FreeDesktop_integration/peazip.png
Terminal=false
Type=Application
Categories=GTK;KDE;Utility;System;Archiving;
Name[en_US]=Peazip
FreeFileSync
FreeFileSync is a free Open Source tool to synchronize files folders. Download it here and unpack it somewhere.
Create a shortcut to launch FreeFileSync from Dash:
sudo nano /usr/share/applications/FreeFileSync.desktop
add the following (replace /home/pontikis/Apps/FreeFileSync/ with your path)
[Desktop Entry]
Name=FreeFileSync
GenericName=Sync Tool
Exec=/home/pontikis/Apps/FreeFileSync/FreeFileSync
Icon=/home/pontikis/Apps/FreeFileSync/FreeFileSync.png
Terminal=false
Type=Application
gparted
GParted is an advanced disk partition editor.
sudo apt-get install gparted
REMARK: You will find Gnome disks in default Ubuntu setup, a tool similar with gparted.
In other Ubuntu flavors you can install Gnome disks, using:
sudo apt-get install gnome-disk-utility
hardinfo
hardinfo is a system profiler and benchmark tool for Linux systems.
sudo apt-get install hardinfo
GSmartControl
GSmartControl is a Hard disk drive and SSD health inspection tool. Actually, it is a graphical interface for smartctl, a command line tool to check (modern) Hard Disks and SSD which support SMART.
sudo apt-get install gsmartcontrol
psensor
psensor is a graphical hardware temperature monitoring application.
sudo apt-get install psensor
AEScrypt
AESCrypt is a Java application with which you can easily and securely encrypt files with Advanced Encryption Standard (AES), either from command line or using GUI.
Download Linux installer here.
Android app available here.
Virtualbox
Virtualbox is an advanced virtualization platform. Read this post: How To Setup Virtualbox on Ubuntu 16.04.
Teamviewer
Teamviewer is remote access and online meeting software (commercial software free for personal use).
Download .deb package here.
Install it (replace teamviewer_11.0.57095_i386.deb with the recent version you have downloaded):
sudo dpkg -i teamviewer_11.0.57095_i386.deb
You will get something like:
Selecting previously unselected package teamviewer:i386.
(Reading database ... 230757 files and directories currently installed.)
Preparing to unpack teamviewer_11.0.57095_i386.deb ...
Unpacking teamviewer:i386 (11.0.57095) ...
dpkg: dependency problems prevent configuration of teamviewer:i386:
 teamviewer:i386 depends on libc6 (>= 2.4).
 teamviewer:i386 depends on libgcc1.
 teamviewer:i386 depends on libasound2.
 teamviewer:i386 depends on libdbus-1-3.
 teamviewer:i386 depends on libexpat1.
 teamviewer:i386 depends on libfontconfig1.
 teamviewer:i386 depends on libfreetype6.
 teamviewer:i386 depends on libjpeg62.
 teamviewer:i386 depends on libpng12-0.
 teamviewer:i386 depends on libsm6.
 teamviewer:i386 depends on libxdamage1.
 teamviewer:i386 depends on libxext6.
 teamviewer:i386 depends on libxfixes3.
 teamviewer:i386 depends on libxinerama1.
 teamviewer:i386 depends on libxrandr2.
 teamviewer:i386 depends on libxrender1.
 teamviewer:i386 depends on libxtst6.
 teamviewer:i386 depends on zlib1g.

dpkg: error processing package teamviewer:i386 (--install):
 dependency problems - leaving unconfigured
Errors were encountered while processing:
 teamviewer:i386
To install missing dependencies
sudo apt-get install -f
You will get something like:
Reading package lists... Done
Building dependency tree
Reading state information... Done
Correcting dependencies... Done
The following additional packages will be installed:
  gcc-6-base:i386 libasound2:i386 libc6:i386 libdbus-1-3:i386 libexpat1:i386
  libfontconfig1:i386 libfreetype6:i386 libgcc1:i386 libgcrypt20:i386 libgpg-error0:i386
  libice6:i386 libjpeg62:i386 liblzma5:i386 libpcre3:i386 libpng12-0:i386 libselinux1:i386
  libsm6:i386 libsystemd0:i386 libuuid1:i386 libx11-6:i386 libxau6:i386 libxcb1:i386
  libxdamage1:i386 libxdmcp6:i386 libxext6:i386 libxfixes3:i386 libxinerama1:i386
  libxrandr2:i386 libxrender1:i386 libxtst6:i386 zlib1g:i386
Suggested packages:
  libasound2-plugins:i386 glibc-doc:i386 locales:i386 rng-tools:i386
The following NEW packages will be installed:
  gcc-6-base:i386 libasound2:i386 libc6:i386 libdbus-1-3:i386 libexpat1:i386
  libfontconfig1:i386 libfreetype6:i386 libgcc1:i386 libgcrypt20:i386 libgpg-error0:i386
  libice6:i386 libjpeg62:i386 liblzma5:i386 libpcre3:i386 libpng12-0:i386 libselinux1:i386
  libsm6:i386 libsystemd0:i386 libuuid1:i386 libx11-6:i386 libxau6:i386 libxcb1:i386
  libxdamage1:i386 libxdmcp6:i386 libxext6:i386 libxfixes3:i386 libxinerama1:i386
  libxrandr2:i386 libxrender1:i386 libxtst6:i386 zlib1g:i386
0 upgraded, 31 newly installed, 0 to remove and 0 not upgraded.
1 not fully installed or removed.
Need to get 5,461 kB of archives.
After this operation, 19.7 MB of additional disk space will be used.
Do you want to continue? [Y/n]
MuseScore
MuseScore is an advanced music composition and notation software.
sudo apt-get install musescore
Games
Solitaire, Mines, Sudoku, Mahjongg are preinstalled. I installed a simple Tetris:
sudo apt-get install quadrapassel
Install Web Development software
This section is optional.
git
Git is a Version Control System.
sudo apt-get install git
Display basic configuration
git config --list
Set basic settings
git config --global user.name 'Your Name'
git config --global user.email you@example.com
git config --global core.editor "nano"
Configure Git to properly handle line endings:
git config --global core.autocrlf input
PhpStorm
PhpStorm is my favorite PHP IDE. It is a commercial Java application by Jetbrains. For instructions read this post: How To Setup And Configure PhpStorm on Ubuntu.
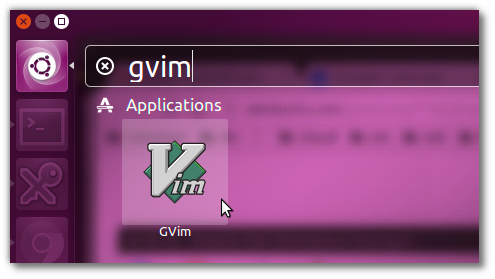
GVim
GVim is Vim with a built-in GUI. I prefer thr Gnome version.
sudo apt-get install vim-gnome
You will get something like this:
Reading package lists... Done
Building dependency tree
Reading state information... Done
The following additional packages will be installed:
  fonts-lato javascript-common libbonobo2-0 libbonobo2-common libbonoboui2-0
  libbonoboui2-common libglade2-0 libgnome-2-0 libgnome2-0 libgnome2-bin
  libgnome2-common libgnomecanvas2-0 libgnomecanvas2-common libgnomeui-0
  libgnomeui-common libgnomevfs2-0 libgnomevfs2-common libjs-jquery
  liborbit-2-0 libruby2.3 rake ruby ruby-did-you-mean ruby-minitest
  ruby-net-telnet ruby-power-assert ruby-test-unit ruby2.3
  rubygems-integration vim-common vim-gui-common vim-runtime vim-tiny
Suggested packages:
  apache2 | lighttpd | httpd libbonobo2-bin desktop-base gnome-icon-theme
  libgnomevfs2-bin libgnomevfs2-extra gamin | fam gnome-mime-data ri ruby-dev
  bundler vim-gnome-py2 | vim-gtk-py2 | vim-gtk3-py2 | vim-athena-py2
  | vim-nox-py2 cscope vim-doc fonts-dejavu vim-gnome-py2 | vim-gtk-py2
  | vim-gtk3-py2 | vim-athena-py2 indent
The following NEW packages will be installed:
  fonts-lato javascript-common libbonobo2-0 libbonobo2-common libbonoboui2-0
  libbonoboui2-common libglade2-0 libgnome-2-0 libgnome2-0 libgnome2-bin
  libgnome2-common libgnomecanvas2-0 libgnomecanvas2-common libgnomeui-0
  libgnomeui-common libgnomevfs2-0 libgnomevfs2-common libjs-jquery
  liborbit-2-0 libruby2.3 rake ruby ruby-did-you-mean ruby-minitest
  ruby-net-telnet ruby-power-assert ruby-test-unit ruby2.3
  rubygems-integration vim-gnome vim-gui-common vim-runtime
The following packages will be upgraded:
  vim-common vim-tiny
2 upgraded, 32 newly installed, 0 to remove and 222 not upgraded.
Need to get 14,3 MB of archives.
After this operation, 66,1 MB of additional disk space will be used.
Do you want to continue? [Y/n]
Launch Gvim from Dash after logout – login:
Poedit
Poedit is an editor for translating software applications using gettext.
sudo apt-get install poedit
(this will also install gettext)
Diffuse
Diffuse is a visual diff and merge tool written in Python.
sudo apt-get install diffuse
Meld
Meld is a another visual diff and merge tool.
sudo apt-get install meld
PgAdmin3
pgAdmin is a feature rich administration tool for PostgreSQL.
sudo apt-get install pgadmin3
Doxygen
Doxygen is a feature rich documentation generator from source code.
sudo apt-get install doxygen-gui graphviz
(this will also install doxygen).
Doxygen GUI executable is doxywizard.
JsDoc Toolkit
JsDoc Toolkit is a Javascript documentation generator from source code.
sudo apt-get install jsdoc-toolkit
Setup peripherals
Printer – scanner
Itâs quite easy to setup a printer (in my case HP OfficeJet 4500).
Select “Printers” from “System Settings” and click “Add”. Then use the wizard.
Web camera
It will be detected automatically during installation. You can try it using the also preinstalled application cheese.
UPS (Uninterruptible Power Supply)
Power Management module (“System Settings” → “Power”) on Ubuntu 16.04 is a flexible tool to manage your computer UPS. If you have a UPS dedicated to your workstation, Ubuntu “Power Management” is all you need. For more advanced configurations you need more specific software. In my case I use an APC UPS. Here are some scenarios to setup and monitor APC UPS:
- Manage UPS Using Power Management on Ubuntu 16.04
- Setup APC UPS on Ubuntu Workstation using apcupsd
- How to Use APC UPS with Two or More Computers – Master Slave Setup
Cloud integration
There are some solutions to enable (two-way) sync from your Linux desktop to many popular Cloud Storage Services . However, only Dropbox, SpiderOak and Tresorit provide Linux Desktop clients.
I use Google Drive as a cloud-based productivity suite. But I do not sync the files. All files are in the cloud. The main reason is that Google has not (yet) released a Drive Client for Linux. Another reason is I believe that keeping files in Cloud is more secure, than to sync them locally, as most Cloud Storage Services provide AES encryption for the files. The only file I have to my desktop workstation is the KeePassX passwords database. I sync this file with laptop and Android devices using Dropbox.
However, if you need a desktop client, here are some of them:
- Dropbox
- Spideroak One
-
There is no official client at this time. You may try Insync or overGrive.
-
There is no official client at this time. You may try this.
- Apple iCloud (there is no official client at this time)
Recovery mode
Press and hold “SHIFT” key during boot. GRUB (boot loader) menu will display. Select “Advanced Ubuntu Options” to enter Recovery mode.
Backup your workstation
Operating system Image backup
I create an image of Operating System partitions (/boot and /root in my case) using Clonezilla Live. I store image files in an external USB disk and additionally I upload them to a storage service. I prefer Amazon S3. So, in case of disk failure I can restore (again with Clonezilla) my workstation easily and quickly.
Data backup
As I keep all my data in the cloud (mostly Google Drive and Amazon S3) I do not keep data in my workstation. As this practice is not the norm, here are some backup solutions for your data:
-
Deja-dup
Simple and reliable front-end of Duplicity. You can create local, remote and cloud backups with Deja-dup. Deja-dup is preinstalled (default Ubuntu setup). However, to install it:
sudo apt-get install deja-dupRunning Deja-Dup for first time press “Install” in the Overview to install software for “Restore”.
If you need Remote server support for Déjà Dup:
sudo apt-get install deja-dup-backend-gvfsIf you need Amazon S3 and Google Cloud Storage support for Déjà Dup:
sudo apt-get install deja-dup-backend-s3If you need Rackspace Cloudfiles support for Déjà Dup:
sudo apt-get install deja-dup-backend-cloudfilesDeja-Dup integrates better with Nautilus (Unity, Gnome) than Thunar in XFCE
. -
Rsnapshot
Powerful Command line utility based on
rsync. You can create local, remote but not cloud backups with rsnapshot. Find a custom solution in this post: How To Create Fast And Reliable Backup Using Rsnapshot.
Browser data backup
I use Google Chrome in all devices. I have more than one “profiles” in Desktop and Laptop, based on some Gmail account. So Chrome sync is enough for me.
Cloud Data backup
I download all my data from Google apps (Gmail, Google Drive, Youtube etc) once per week, manually, using Google Takeout.
NOTE: There is not yet Google Takeout API provided by Google. You can automate Google Apps backup using commercial services as Spinbackup, Spanning Backup etc.
I keep these files in a locale storage server (a simple computer running Ubuntu server edition). I upload these files in Amazon S3, using AES encryption provided by Amazon. For this purpose I use a custom shell script I have created.
Synopsis
Operating system
| Base Linux System | default setup |
CLI software
| File manager | Midnight commander | |
| Process viewer | htop | |
| Bandwidth usage monitor | iftop | |
| Networking | OpenSSH | |
| Samba | ||
| File archivers | p7zip | |
| unrar | ||
| Secure delete | wipe |
Programming languages
| GNU bash | 4.3.43 | default setup |
| Perl | 5.22.1 | default setup |
| Python | 2.7.11+ | default setup |
| Java | Oracle JDK 8 |
Desktop environment
| Unity | default setup |
Apps
| Terminal | Gnome Terminal | default setup |
| Byobu | ||
| Terminator | ||
| Settings manager | System Settings | default setup |
| dconf Editor | ||
| Unity Tweak tool | ||
| Compiz config settings manager | ||
| NVIDIA X Server Settings | ||
| Indicators applets | System Load Indicator | |
| File manager | Nautilus | default setup |
| Password manager | KeePaasX | |
| Cloud storage client | Dropbox | |
| Package manager | Synaptic | |
| Web browser | Firefox | default setup |
| Google Chrome | ||
| Mail client | Thunderbird | default setup |
| Download manager | uget | |
| BitTorrent client | uget with aria2 plugin | |
| BitTorrent client | Transmission | default setup |
| FTP client | Filezilla | |
| Text editor | Gedit | default setup |
| Leafpad | ||
| Run as user | gksu | |
| Screen tool for eyes protection | Redshift | |
| Office suite | LibreOffice | default setup |
| PDF reader | Document Viewer | default setup |
| Image/photo editor | Gimp | |
| Image viewer | Gnome Image viewer | default setup |
| Photo Manager | Shotwell | default setup |
| Screenshot take | Gnome Screenshot | default setup |
| Shutter | ||
| Graph editor | yEd | |
| Extra media codecs | ubuntu-restricted-extras | |
| Video converter (FFmpeg GUI) | Winff | |
| Video editor | OpenShot | |
| Slideshow editor | Imagination | |
| Screen Recorder | Kazam | |
| Web cam | Cheese | default setup |
| Audio editor | Audacity | |
| Media player | Rhythmbox | default setup |
| Totem movie player | default setup | |
| VLC | ||
| Scanning | Simple scan | default setup |
| gscan2pdf | ||
| CD burning | Brasero | |
| File archivers | Gnome Archive Manager | default setup |
| Peazip | ||
| Sync tool | FreeFileSync | |
| System profiler | hardinfo | |
| Disk partitioner, S.M.A.R.T. monitoring, benchmarking etc | Gnome disks | default setup |
| Disk partitioner | gparted | |
| Disk health inspection tool | GSmartControl | |
| Hardware temperature monitoring tool | psensor | |
| Backup | Deja-dup | default setup |
| Encryption | AEScrypt | |
| Virtualization | Virtualbox | |
| Remote access | Desktop Sharing | default setup |
| Teamviewer | ||
| Music Notation | MuseScore | |
| Games | Solitaire | default setup |
| Mines | default setup | |
| Sudoku | default setup | |
| Mahjongg | default setup | |
| Quadrapassel |
Apps for Web Development
| Version control | Git | |
| PHP IDE | PhpStorm | |
| Code editor | Gvim | |
| Localization tool | Poedit | |
| Diff/merge tools | Diffuse | |
| Meld | ||
| Database Manager | PgAdmin3 | |
| Documentation generator | Doxygen | |
| Javascript Documentation generator | JsDoc Toolkit |
Screenshots Collection
View Screenshots Collection here.
Entrepreneur | Full-stack developer | Founder of MediSign Ltd. I have over 15 years of professional experience designing and developing web applications. I am also very experienced in managing (web) projects.