
Debian is an ideal solution for servers. Stability is the main advantage of Debian. At the same time the stable Debian version doesn’t contain the most recent packages. So, Debian is not one of first choices for someone who wants to use Linux for Desktop. Probably he/she will choose Ubuntu or Linux Mint or Fedora.
I use Archlinux on my desktop PC. Even if Archlinux is not suitable for the novice Linux user, it is rock solid, it contains cutting edge software and you can find any package you want in its repositories (official or AUR).
But, recently, I setup my old laptop, Fujitsu Siemens AMILO Notebook Xi 3650 with Debian 7 Wheezy and XFCE4. I was surprised with the final result! Not a super cool and fancy desktop, but a nice environment with great support for sound, Flash, Nvidia and any kind of networking “out of the box”.
Why Xfce? Xfce is a lightweight desktop environment, fast, simple and user friendly. Personally, I am not a fan of latest versions of Gnome, KDE or Ubuntu Unity.
Of course, it’s a matter of choice, but I don’t like graphical wizards and I can not stand unstable systems. I want to have to control of what I install on my computer and how.
Some little hacks
Default Debian 7 installation comes with XFCE 4.8 and LibreOffice 3.5 As latest XFCE 4.10 is much more better than the previous version (the same with LibreOffice), I use some hacks to setup these versions on Debian stable. It is not required, but it worths the try. This is possible by using repositories of Testing version (Debian Jessie). More information is available here and here.
Remarks
In the following tutorial, I present all steps I followed, but
some of them are not required for a common desktop PC. So, I marked
them as “optional”. I use nano text editor, but you
can use vi or other graphical editor e.g.
geany. I also use systemd, so to restart
apache (for example), I use systemd restart
apache2.service instead of the equivalent service
apache2 restart on systems with initscripts.
Base system
Download small Debian image from here.
I don’t use the graphic installation mode and I don’t setup graphical environment in this phase. I will do it later
Detailed information with screenshots is available in this post.
Disk partitions:
Disk 1 – 300 GB
| patrition | size (GB) |
|---|---|
| /boot 4 | 4 |
| /root | 280 |
| swap | 16 |
| /tmp | 20 |
Disk 2 – 300 GB
| patrition | size (GB) |
|---|---|
| /home | 40 |
| /var | 80 |
| /data | 50 |
| /store | 150 |

Software selection:
- SSH server
- Laptop
- Standard system utilities
The base system has been installed.
At this time your package sources (/etc/apt/sources.list) will look like:
#

# deb cdrom:[Debian GNU/Linux 7.6.0 _Wheezy_ - Official amd64 NETINST Binary-1 20140712-14:09]/ wheezy main

#deb cdrom:[Debian GNU/Linux 7.6.0 _Wheezy_ - Official amd64 NETINST Binary-1 20140712-14:09]/ wheezy main

deb http://ftp.gr.debian.org/debian/ wheezy main
deb-src http://ftp.gr.debian.org/debian/ wheezy main

deb http://security.debian.org/ wheezy/updates main
deb-src http://security.debian.org/ wheezy/updates main

# wheezy-updates, previously known as 'volatile'
deb http://ftp.gr.debian.org/debian/ wheezy-updates main
deb-src http://ftp.gr.debian.org/debian/ wheezy-updates main
Systemd (optional)
(optional but highly recommended)
apt-get install systemd
nano /etc/default/grub
GRUB_CMDLINE_LINUX_DEFAULT="quiet init=/bin/systemd"
update-grub && reboot
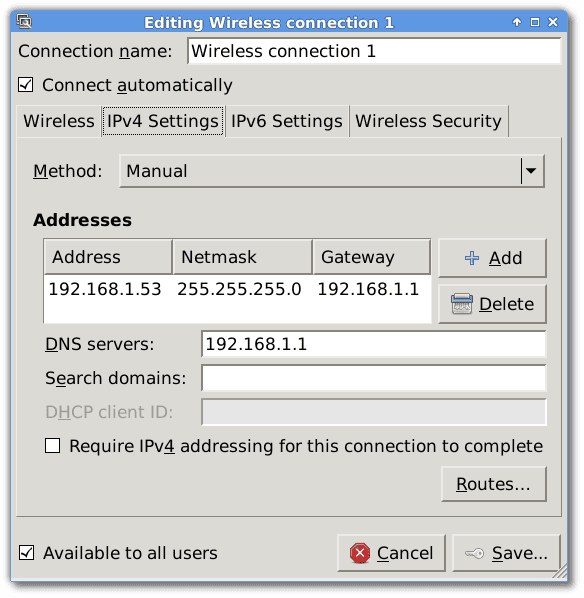
Network setup
You can keep default DHCP settings. But if you want a static IP, try the following:
nano /etc/network/interfaces

# The primary network interface
#allow-hotplug eth0
#iface eth0 inet dhcp

auto eth0
iface eth0 inet static
address 192.168.1.53
netmask 255.255.255.0
gateway 192.168.1.1
reboot
systemctl reboot
After setup of graphical environment (XFCE), I will setup a graphical Network manager.
NTP
Always setup NTP (Network Time Protocol) to keep your computer time synced with time servers:
apt-get install ntp
Updates
One of the most important tasks is to keep your system updated.
apt-get install apticron
apt-get install update-notifier-common
apt-get install debian-goodies
For details read this post: Simple Steps to Update a Debian System.
Exim4
Exim4 is the default Debian MTA (Message transfer agent). It will cover most of your needs in a server or desktop system:
See details on this post.
Forward root mail
First add the root alias
nano /etc/aliases
root:you@your_mail.com
Then, rebuild aliases:
newaliases
Webmin
Webmin is an awesome control panel, with which you can perfom many administration tasks.
Modify your packages sources:
nano /etc/apt/sources.list
add:
deb http://download.webmin.com/download/repository sarge contrib
deb http://webmin.mirror.somersettechsolutions.co.uk/repository sarge contrib
Add the necessary key
cd /root
wget http://www.webmin.com/jcameron-key.asc
apt-key add jcameron-key.asc
and update package sources
apt-get update
Finally:
apt-get install webmin
Rsync
Probably, the most useful tool for backup operations
apt-get install rsync
OpenVPN
If you need a VPN, you can try OpenVPN, a really great Open Source VPN solution
apt-get install openvpn
See details on this post.
Samba
Samba is a free implementation of the SMB/CIFS networking protocol. A common use (among many others) is to access your Linux file system from a Microsoft Windows computer:
Install samba
apt-get install samba
Define your shares, for example:
nano /etc/samba/smb.conf

[home]
path=/home/your-username
writable=yes
browsable=yes

[data]
path=/data
writable=yes
browsable=yes

[store]
path=/store
writable=yes
browsable=yes
Add a samba user:
pdbedit -a -u your-username
Restart samba:
systemctl restart samba.service
Sample usage:
List the shares of a machine with IP 192.168.1.50:
smbclient -L 192.168.1.50 -U%
Mount and unmount a share:
mount -t cifs //192.168.1.53/lib /mnt/test -o user=USERNAME,password=PASSWORD
umount /mnt/test
Sudo
Sudo allows comkon users to run programs with security privileges of user root.
apt-get install sudo
Add you in sudoers:
usermod -a -G sudo your-username
s3cmd
s3cmd is an open source command line client for Amazon S3 (optional installation)
apt-get install s3cmd
htop
htop is a process viewer for Linux (an alternative of
top command)
apt-get install htop
NTFS support
Read and write support for NTFS drives
apt-get install ntfs-3g
NVIDIA drivers
Add contrib non-free to your package sources list.
At this step, it will look like:
#

# deb cdrom:[Debian GNU/Linux 7.6.0 _Wheezy_ - Official amd64 NETINST Binary-1 20140712-14:09]/ wheezy main

#deb cdrom:[Debian GNU/Linux 7.6.0 _Wheezy_ - Official amd64 NETINST Binary-1 20140712-14:09]/ wheezy main

deb http://ftp.gr.debian.org/debian/ wheezy main contrib non-free
deb-src http://ftp.gr.debian.org/debian/ wheezy main contrib non-free

deb http://security.debian.org/ wheezy/updates main contrib non-free
deb-src http://security.debian.org/ wheezy/updates main contrib non-free

# wheezy-updates, previously known as 'volatile'
deb http://ftp.gr.debian.org/debian/ wheezy-updates main contrib non-free
deb-src http://ftp.gr.debian.org/debian/ wheezy-updates main contrib non-free

deb http://download.webmin.com/download/repository sarge contrib
deb http://webmin.mirror.somersettechsolutions.co.uk/repository sarge contrib
Update package sources:
apt-get update
Install nvidia-detect
apt-get install nvidia-detect
Run nvidia-detect
nvidia-detect
You will get something like:
Detected NVIDIA GPUs:
01:00.0 VGA compatible controller [0300]: NVIDIA Corporation G96 [GeForce 9600M GT] [10de:0649] (rev a1)
Your card is supported by the default drivers and version 173.
It is recommended to install the
nvidia-glx
package.
Now, install the driver:
apt-get install nvidia-kernel-dkms
Here are some useful messages you will get:
┌──────────────────────────────────┤ Configuring libgl1-nvidia-glx:amd64 ├──────────────────────────────────┐
│                                                                                                           │
│ Conflicting nouveau kernel module loaded                                                                  │
│                                                                                                           │
│ The free nouveau kernel module is currently loaded and conflicts with the non-free nvidia kernel module.  │
│                                                                                                           │
│ The easiest way to fix this is to reboot the machine once the installation has finished.                  │


┌──────────────────────────────┤ Configuring xserver-xorg-video-nvidia ├───────────────────────────────┐
│                                                                                                      │
│ Manual configuration required to enable Nvidia driver                                                │
│                                                                                                      │
│ The Nvidia driver is not yet configured; it needs to be enabled in xorg.conf before it can be used.  │
│                                                                                                      │
│ Please see the package documentation for instructions.                                               │
│                                                                                                      │
Install configuration utility nvidia-xconfig:
apt-get install nvidia-xconfig
Run nvidia-xconfig:
nvidia-xconfig
At the end you will (probaly) get the message:
WARNING: Unable to locate/open X configuration file.

WARNING: Unable to parse X.Org version string.

New X configuration file written to '/etc/X11/XF86Config'
In this case, copy configuration file created to /etc/X11/xorg.conf
cp /etc/X11/XF86Config /etc/X11/xorg.conf
reboot
systemctl reboot
XFCE 4.8
First install XFCE 4.8 which is the XFCE version of Debian Wheezy:
apt-get install xfce4 xfce4-goodies
reboot
systemctl reboot
XFCE 4.10
It is worth to try to install XFCE 4.10, which contains much more improvements. 4.10 is the XFCE version of Debian Jessie, which now is Testing Release (it will become Stable after one year or more).
So, add the following line to your package sources:
deb http://ftp.gr.debian.org/debian/ jessie main contrib non-free
but…
…ensure that Wheezy will remain your default release when you are getting updates:
nano /etc/apt/apt.conf.d/30default-release
add
APT::Default-Release "wheezy";
update (again…) your pachage sources, (as usual):
apt-get update
Finally, install XFCE 4.10 (and reboot):
apt-get -t jessie install xfce4 xfce4-goodies
reboot
systemctl reboot
Some of XFCE applications for commnon use are:
- Terminal: Xfce Terminal
- File Manager: Thunar (“tabs” supported in 4.10)
- CD/DVD Burner: Xfburn
- Image Viewer: Ristretto
XFCE also supports automounting (CD, USB etc).
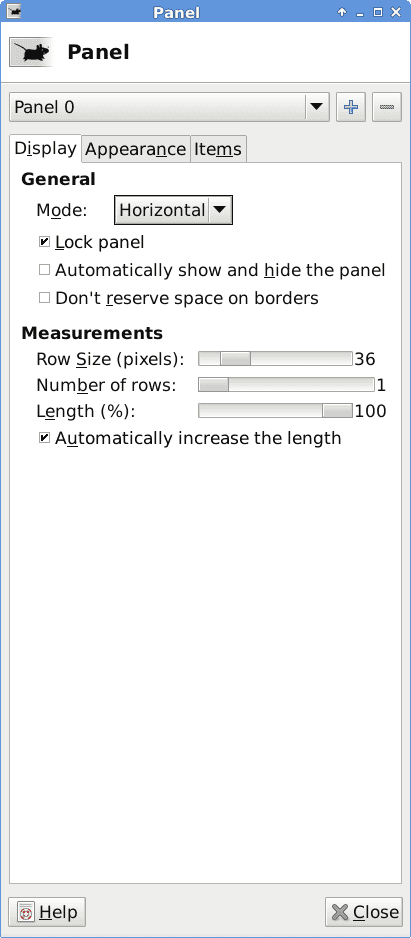
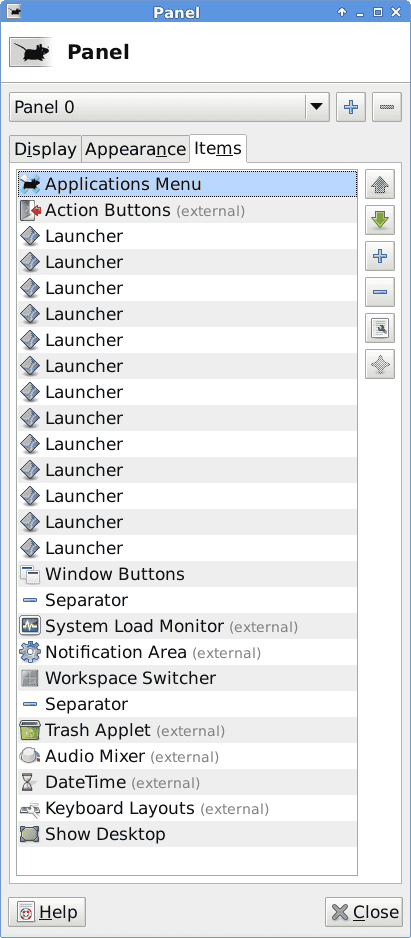
TWeak XFCE 4.10
configure panel
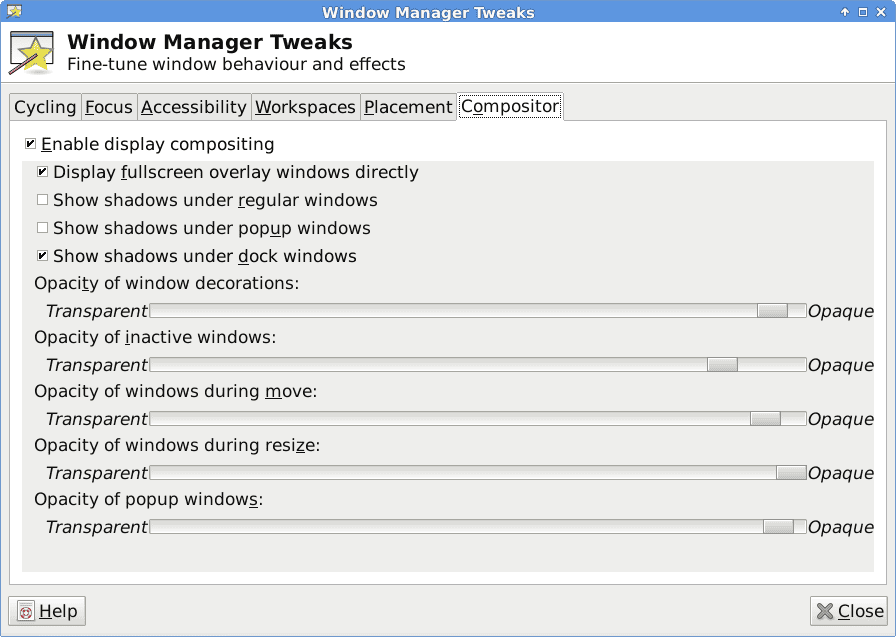
configure Window Manager
Login manager – No Thanks!
I did not setup some login manager (in order to login in graphical mode). I prefer my computer to start in command line mode and when I want the graphical environment I run
startx
But, if you like so, you could try SLiM . See also here.
Next steps
Hopefully, at this time a base Linux system with XFCE graphical interface and Nvidia support is up and running! During next steps, I will setup a graphical network manager, an HP printer and scanner and desktop applications for every day use. Additionally I will setup PHP development tools and my Github projects. Of course, the last step is optional.
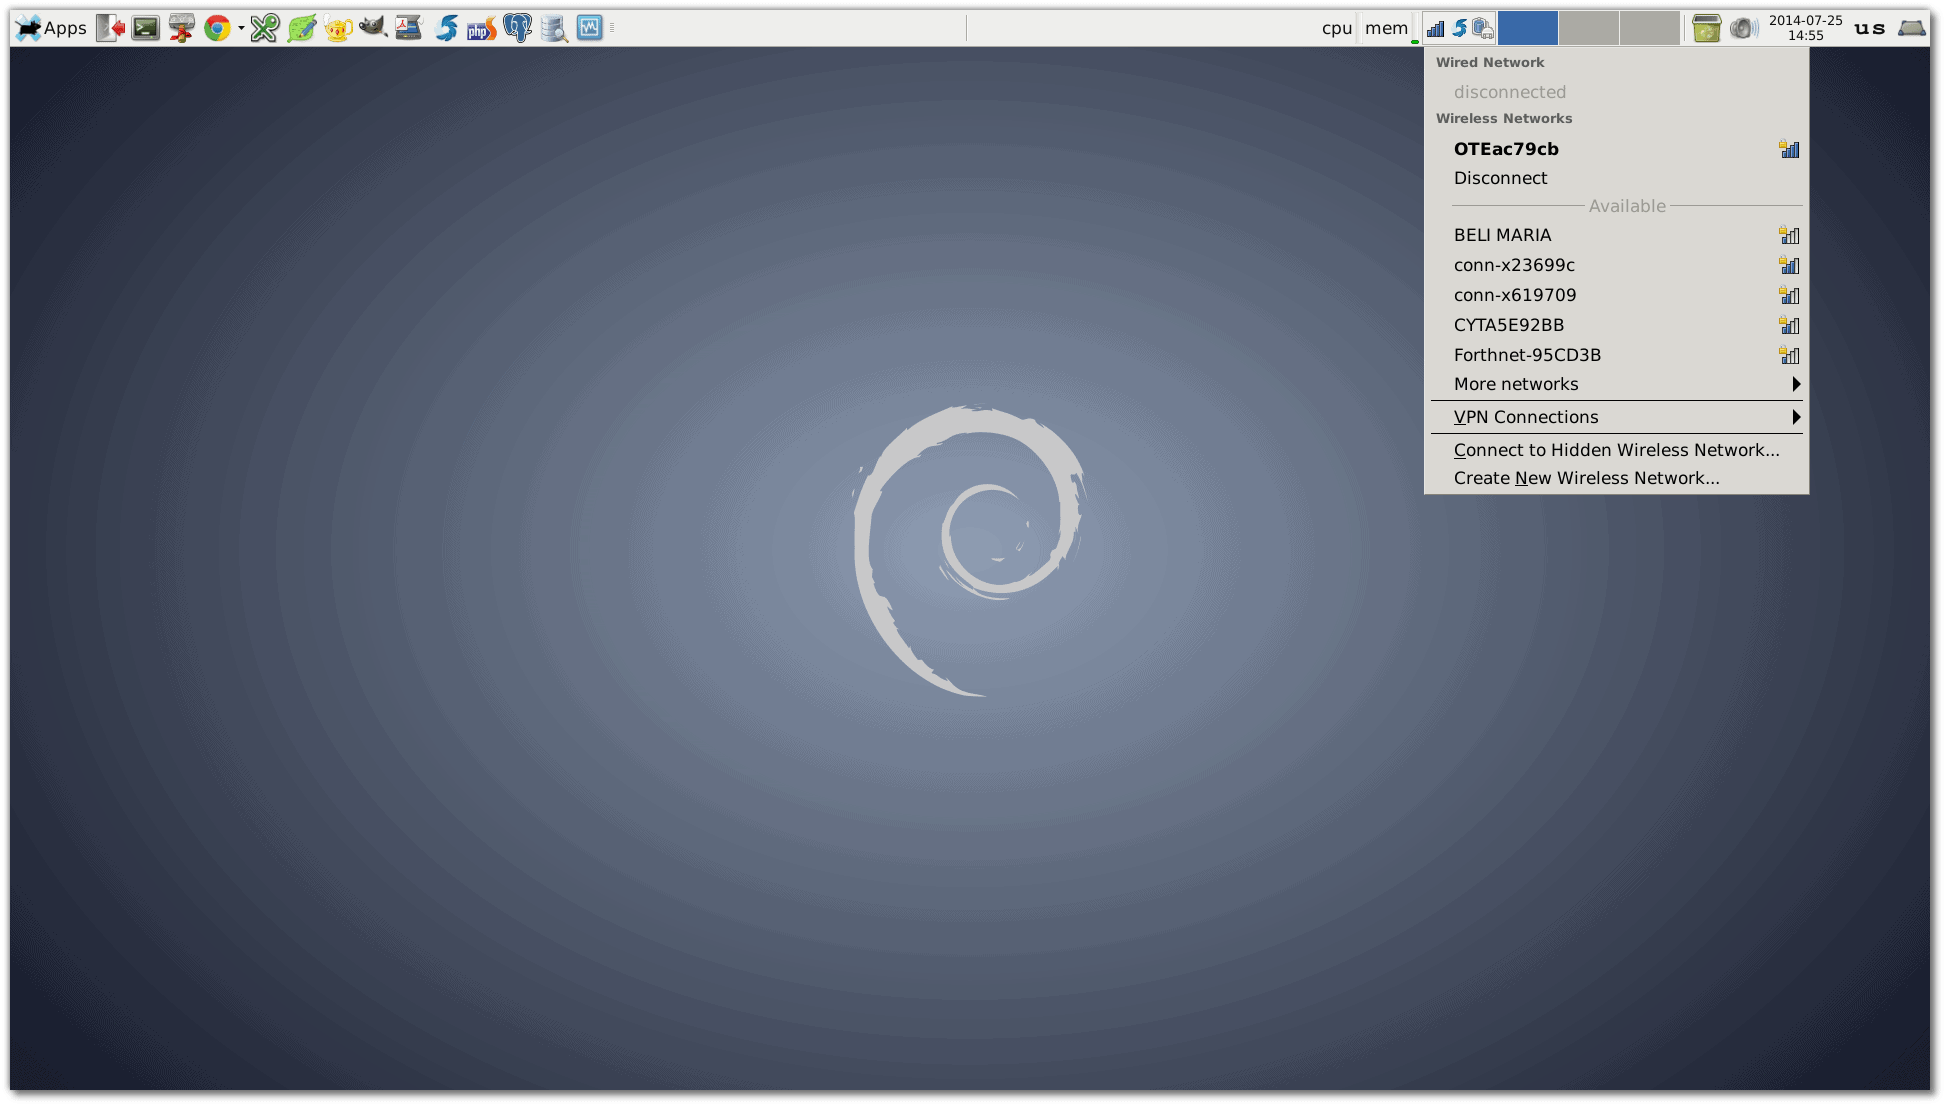
NetworkManager
During boot, my computer reports MISSING (non free firmware). Its the about wifi. Fortunately it is available on Debian repos:
apt-get install firmware-iwlwifi
Install NetworkManager
apt-get install network-manager-gnome
Check if you are member of group netdev
grep your-username /etc/groups
If not, add yourself to this group
usermod -a -G netdev your-username
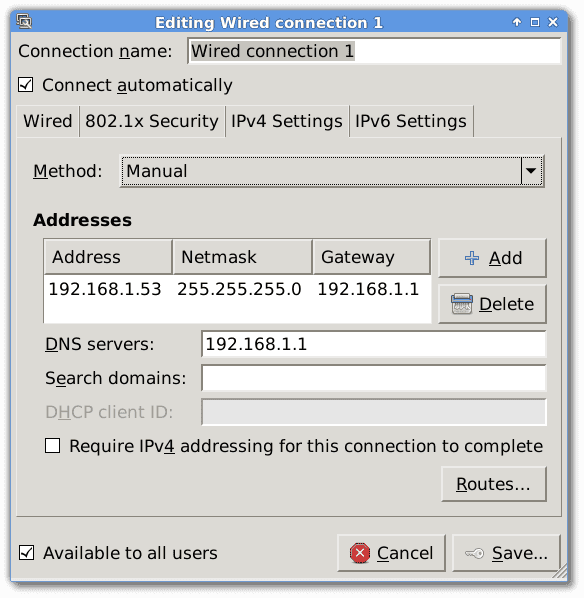
Change the setting you made in /etc/network/interfaces, so this file will now look like:
# This file describes the network interfaces available on your system
# and how to activate them. For more information, see interfaces(5).

# The loopback network interface
auto lo
iface lo inet loopback

# The primary network interface
#allow-hotplug eth0
#iface eth0 inet dhcp

#auto eth0
#    iface eth0 inet static
#    address 192.168.1.53
#    netmask 255.255.255.0
#    gateway 192.168.1.1
In most cases, the following change is required:
nano /etc/NetworkManager/NetworkManager.conf
add
managed=true
If you use OpenVPN and you want to manage VPN connections using Network Manager, install:
apt-get install network-manager-openvpn-gnome
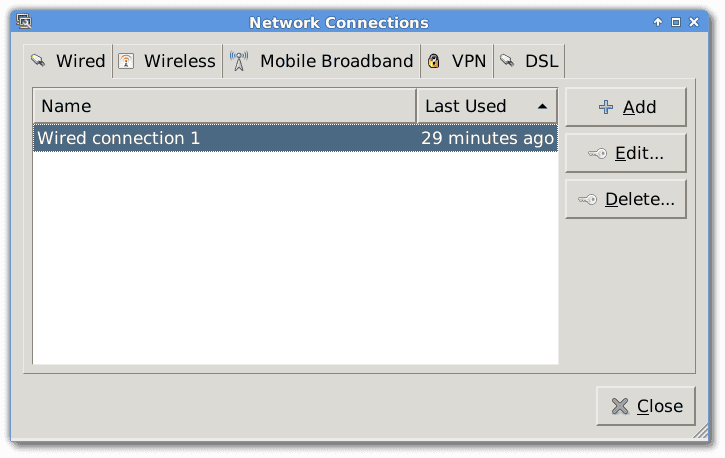

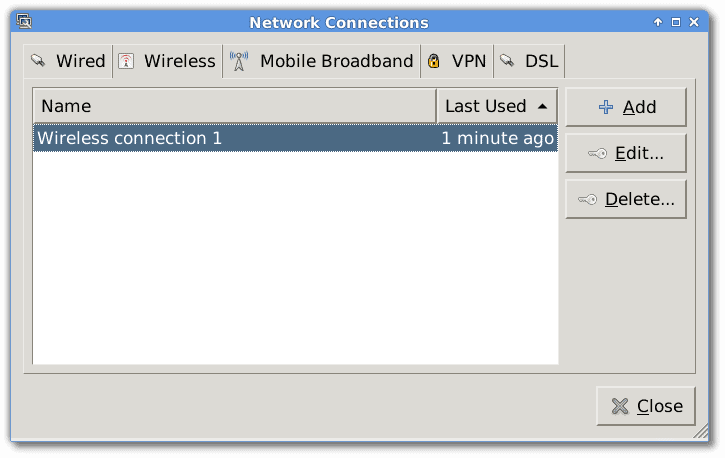
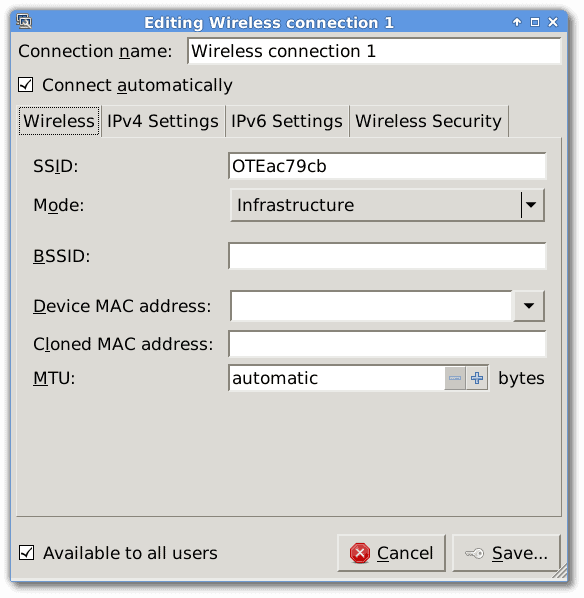
SEE ALSO the screenshot at the end of this post (WIFI detection).
Fonts
Install Microsoft fonts
apt-get install ttf-mscorefonts-installer
I use terminus font in Terminal:
apt-get install xfonts-terminus
keepassx password manager
KeePassX is an application for people with extremly high demands on secure personal data management. It has a light interface, is cross platform and published under the terms of the GNU General Public License.
apt-get install keepassx
Tools
Various tools: Among others, filezilla (FTP manager), fatrat (download manager with Torrent support)
apt-get install filezilla
apt-get install fatrat
apt-get install galculator
apt-get install p7zip p7zip-full p7zip-rar
apt-get install xarchiver
Google Chrome
Add the following line to your package sources (/etc/apt/sources.list)
deb http://dl.google.com/linux/chrome/deb/ stable main
install the necessary key
wget -q -O - https://dl-ssl.google.com/linux/linux_signing_key.pub | apt-key add -
update sources
apt-get update
Finally, install Google Chrome
apt-get install google-chrome-stable
Firefox
Remove Iceweasel. What is Iceweasel?
apt-get remove iceweasel
Add the following line to your package sources (/etc/apt/sources.list)
deb http://downloads.sourceforge.net/project/ubuntuzilla/mozilla/apt all main
install the necessary key
apt-key adv --recv-keys --keyserver keyserver.ubuntu.com C1289A29
update sources
apt-get update
Finally, install Firefox
apt-get install firefox-mozilla-build
Flash
For Flash support
apt-get install flashplugin-nonfree
Text editors
Leadpad is a simple text editor
apt-get install leafpad
Geany is an advanced text editor
apt-get install geany
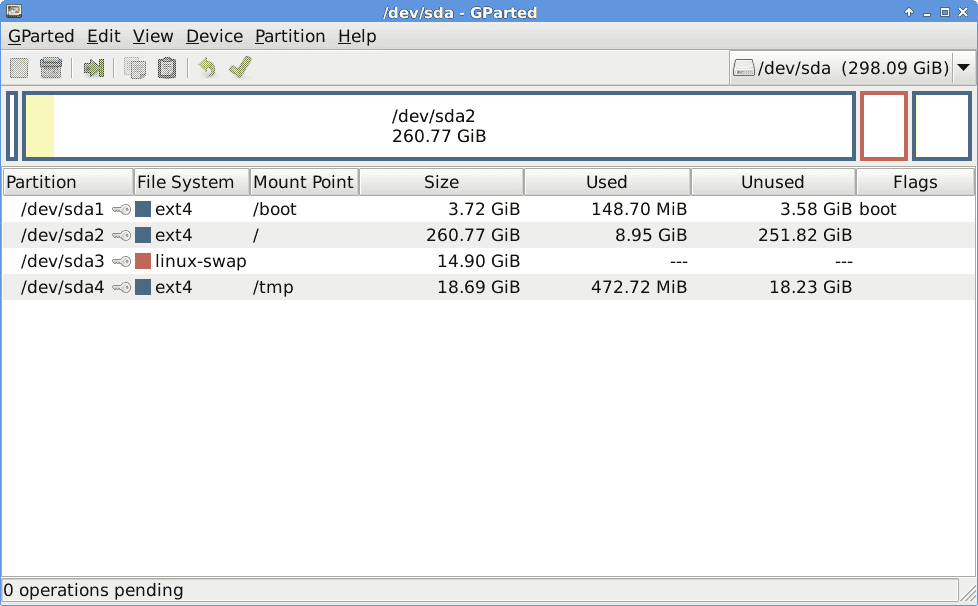
System tools
Partition editor
apt-get install gparted
Hardware info
apt-get install lshw lshw-gtk
apt-get install hardinfo
apt-get install sysinfo
SMART monitor
GSmartControl is a graphical user interface for smartctl (from smartmontools package), which is a tool for querying and controlling SMART (Self-Monitoring, Analysis, and Reporting Technology) data on modern hard disk and solid-state drives. It allows you to inspect the drive’s SMART data to determine its health, as well as run various tests on it.
apt-get install smartmontools
apt-get install gsmartcontrol
Virtualbox
VirtualBox is a powerful x86 and AMD64/Intel64 virtualization product for enterprise as well as home use.
apt-get install virtualbox
Java
Most JAVA applications require the Oracle JAVA SDK or JRE, so I prefer to download manual the preferred version (as .tar.gz) from
http://www.oracle.com/technetwork/java/javase/downloads/index.html
manually uppack to /opt and then to use update-alternatives Debian command to select the
default version (if many). So, to declare a version with
update-alternatives:
update-alternatives --install /usr/bin/java java /opt/jdk1.7.0_65/bin/java 20000
To choose the default:
update-alternatives --config java
There are 2 choices for the alternative java (providing /usr/bin/java).

Selection    Path                                            Priority   Status
------------------------------------------------------------
* 0            /opt/jdk1.7.0_65/bin/java                        20000     auto mode
1            /opt/jdk1.7.0_65/bin/java                        20000     manual mode
2            /usr/lib/jvm/java-6-openjdk-amd64/jre/bin/java   1061      manual mode
Libreoffice
First install Libreoffice 3, which is the Debian Wheezy version
apt-get install libreoffice
Then add this line to your package sources (/etc/apt/sources.list)
deb http://ftp.debian.org/debian/ wheezy-backports main
update package sources
apt-get update
Install Libreoffice 4
apt-get -t wheezy-backports install libreoffice
You may change Libreoffice java SDK from Options
PDF viewer
Evince is a document viewer for multiple document formats. The goal of evince is to replace the multiple document viewers that exist on the GNOME Desktop with a single simple application. Evince is specifically designed to support the file following formats: PDF, Postscript, djvu, tiff, dvi, XPS, SyncTex support with gedit, comics books (cbr,cbz,cb7 and cbt).
apt-get install evince
Screenshot tool
Shutter is a feature-rich screenshot program for Linux based operating systems such as Ubuntu. You can take a screenshot of a specific area, window, your whole screen, or even of a website â apply different effects to it, draw on it to highlight points, and then upload to an image hosting site, all within one window. Shutter is free, open-source, and licensed under GPL v3.
apt-get install shutter
Photo editing
GIMP is the GNU Image Manipulation Program. It is a freely distributed piece of software for such tasks as photo retouching, image composition and image authoring. It works on many operating systems, in many languages.
apt-get install gimp
Media player
VLC media player is a free and open source cross-platform multimedia player and framework that plays most multimedia files as well as DVDs, Audio CDs, VCDs, and various streaming protocols.
apt-get install vlc
Printer and Scanner
An HP printer, HP Officejet 4500 will be installed. A static IP (192.168.1.71) has been assigned to this printer.
First install CUPS (Common Unix Printing System)
apt-get install cups cups-client
In case of HP printer, install drivers from HP Linux Imaging and Printing.
apt-get install hplip
Start CUPS service
systemctl start cups.service
In most cases, the following change is required:
usermod -a -G lpadmin your-username
Important: create URL for your device:
hp-makeuri 192.168.1.71
you will get something like
HP Linux Imaging and Printing System (ver. 3.12.6)
Device URI Creation Utility ver. 5.0

Copyright (c) 2001-14 Hewlett-Packard Development Company, LP
This software comes with ABSOLUTELY NO WARRANTY.
This is free software, and you are welcome to distribute it
under certain conditions. See COPYING file for more details.

CUPS URI: hp:/net/Officejet_4500_G510g-m?ip=192.168.1.71
SANE URI: hpaio:/net/Officejet_4500_G510g-m?ip=192.168.1.71
HP Fax URI: hpfax:/net/Officejet_4500_G510g-m?ip=192.168.1.71

Done.
Run the diagnostic utility to ensure your device is recognized (optional but useful).
hp-check
Finally, add printer using CUPS web interface
Select http protocol and set the above hp url. Then select a driver with cups.
More info here.
Test your scanner:
scanimage -L
Install scanning software:
apt-get install libsane sane-utils
apt-get install xsane
A GUI to produce PDFs from scanned documents
apt-get install gscan2pdf
More info here.
Web develpoment software
Install memcached. More details in this post: Memcached Installation and Configuration with PHP on Debian.
apt-get install memcached
apt-get install poedit
Install gettext. More details in this post: PHP and Javascript Internationalization using Gettext and Poedit.
apt-get install gettext
MySQL database server
apt-get install mysql-server
Apache web server
apt-get install apache2 apache2-mpm-prefork

a2enmod rewrite
nano /etc/apache2/sites-available/default
#Options Indexes FollowSymLinks MultiViews
#AllowOverride None

Options -Indexes FollowSymLinks MultiViews
AllowOverride All

a2enmod deflate

systemctl restart apache2.service
PHP
apt-get install php5
Install PHP modules you need. In my case:
apt-get install php5-mysqlnd php5-pgsql php5-intl php5-gd php5-memcached php-gettext php5-mcrypt php-gd php-curl
More details in this post: Debian 7 Wheezy Dedicated Web Server Setup Step by Step.
Install git
apt-get install git
Diff tools
apt-get install meld
apt-get install diffuse
Other development tools
apt-get install doxygen doxygen-gui

mkdir /var/www/adminer
cd /var/www/adminer
wget http://downloads.sourceforge.net/adminer/adminer-4.1.0-en.php
mv adminer-4.1.0-en.php index.php

apt-get install pgadmin3

mkdir /var/www/phpMemcachedAdmin
cd /var/www/phpMemcachedAdmin
wget http://phpmemcacheadmin.googlecode.com/files/phpMemcachedAdmin-1.2.2-r262.tar.gz
tar -xvzf phpMemcachedAdmin-1.2.2-r262.tar.gz
chmod +r *
chmod 0777 Config/Memcache.php
PHP IDE
I use PhpStorm (manual installation).
Deploy projects (from Github)
If you have Github projects, you can easily deploy them in your development workstation:
ssh-keygen -t rsa -C "your_email@example.com"
cat .ssh/id_rsa.pub
Add key to Github. See how.
chown your-username:your-username /var/www

cd /var/www
git clone git@github.com:your-username/some_project.git
Desktop screenshot
Enjoy!
Entrepreneur | Full-stack developer | Founder of MediSign Ltd. I have over 15 years of professional experience designing and developing web applications. I am also very experienced in managing (web) projects.