
Debian 7.0 Wheezy has been officially released on May 5, 2013. Wheezy is powered by Linux kernel 3.2 and multiarch support. Concerning LAMP software, Apache 2.2.22 MySQL 5.5.30 and PHP 5.4.4 are included. Debian 7 supports systemd. More information here.
In this post I describe a dedicated server setup, using Debian Wheezy. It is a Hetzner EX4S dedicated server with IP 144.76.70.100 My blog, my company website and some other web projects will be hosted in this server.
I use Dyn.com for all my DNS and e-MAIL needs, so I will not setup bind name server or a full blown mail server. Default Debian MTA (exim4) is enough for the server to send emails.
I selected a minimal Debian amd64 server (basic Debian system and SSH). Thanks to Hetzner staff, the server was up and running in less than an hour. As usual, they sent me the IP and root password. Below I describe the whole procedure after this point.
Connect using SSH
This is the first and should be the last time you are remotely connected with the server as root:
ssh 144.76.70.100 -l root
Change root password
Use:
passwd
remove /robot.sh
This step concerns only Hetzner servers.
/etc/rc2.d/S99Zrobot (symbolic link to /robot.sh) is just for reporting a successful install and should normally have been removed immediately. Remove them in case has been not automatically removed.
mv /robot.sh /robot.sh.bak
rm /etc/rc2.d/S99Zrobot
If /robot.sh is present, apt-get will fail with the following message
insserv: warning: script 'S99Zrobot' missing LSB tags and overrides
Perform a full system update
Using apt-get:
apt-get update && apt-get -V upgrade
Update files database
Use:
updatedb
Color Bash Prompt
To add color to bash prompt, you can follow this guide, where a global solution is provided (recommended).
As an alternative:
To add color to common user prompt:
cd /home/pontikis
nano .bashrc
uncomment #force_color_prompt=yes
...
force_color_prompt=yes
...
To add red color to root prompt:
cd /root
nano .bashrc
Set PS1 as follows:
PS1='${debian_chroot:+($debian_chroot)}[�33[01;31m]u@h[�33[00m]:[�33[01;34m]w[�33[00m]$ '
Also, find # You may uncomment the following lines if you want `ls’ to be colorized: and uncomment the following lines
To see the changes you have to logoff and login again, or go to home and give
. .bashrc
Customize nano text editor
To dislpay line numbers, uncomment # set const
nano /etc/nanorc
# set const
set const
Install systemd
Use:
apt-get install systemd
Update grub and reboot
nano /etc/default/grub
Modify GRUB_CMDLINE_LINUX_DEFAULT adding init=/bin/systemd
GRUB_CMDLINE_LINUX_DEFAULT="nomodeset init=/bin/systemd"
Finally
update-grub && reboot
Install ntp (Network Time Protocol)
Using apt-get
apt-get install ntp
Set server timezone
Using dpkg
dpkg-reconfigure tzdata
From http://wiki.debian.org/TimeZoneChanges
Restarting Daemons and Long-Running Programs After the zoneinfo files are updated, you may need to restart daemons and other long-running programs to get them to use the new zone information. Examples of such programs include apache, bind, cron, fetchmail -d, inetd, mailman, sendmail, and sysklogd. A common symptom of this problem is seeing incorrect timestamps mixed in with the correct timestamps in your log files (e.g. /var/log/syslog). Even interactive programs like “mutt” may continue to use the old timezone information until they are restarted.
For example, restart cron
systemctl restart cron.service
An easier way is to restart your system
reboot
REMARK: Server date and time settings are very important for services like Amazon S3 backup, OpenVPN, NFS etc, where “client” and “server” machines must have the same settings.
Install webmin
Add the following lines to /etc/apt/sources.list
deb http://download.webmin.com/download/repository sarge contrib
deb http://webmin.mirror.somersettechsolutions.co.uk/repository sarge contrib
Add apt key:
cd /root
wget http://www.webmin.com/jcameron-key.asc
apt-key add jcameron-key.asc
Finally
apt-get update
apt-get install webmin
Create common user
You can use webmin interface (recommended)
Otherwise, you can use adduser srcipt
adduser pontikis
Adding user `pontikis' ...
Adding new group `pontikis' (1001) ...
Adding new user `pontikis' (1001) with group `pontikis' ...
Creating home directory `/home/pontikis' ...
Copying files from `/etc/skel' ...
Enter new UNIX password:
Retype new UNIX password:
passwd: password updated successfully
Changing the user information for pontikis
Enter the new value, or press ENTER for the default
        Full Name []: Christos Pontikis
        Room Number []:
        Work Phone []:
        Home Phone []:
        Other []:
Is the information correct? [Y/n] y
or the original linux commands
groupadd pontikis
useradd -m -g pontikis -s /bin/bash pontikis
passwd pontikis
It is also important to create a Webmin user (pontikis in my case), to avoid login to Webmin as root.
Harden SSH
Edit SSH configuration:
nano /etc/ssh/sshd_config
Make the following changes
...
PermitRootLogin no
...
X11Forwarding no
...
AllowUsers pontikis ...
...
Restart SSH
systemctl restart ssh.service
SSH key based authentication
To connect from workstation to server machine, add your public key to server.
ssh-copy-id -i ~/.ssh/id_rsa.pub 144.76.70.100
Change hostname
Add the hostname (cosmos.medisign.com in my case) to /etc/hostname and /etc/hosts so local address(es) resolves with the new system name and reboot.
Harden kernel using /etc/sysctl.conf
It was a pleasant surprise to see that Hetzner default installation was included important changes to /etc/sysctl.conf:
### Hetzner Online AG installimage
# sysctl config
#net.ipv4.ip_forward=1
net.ipv4.conf.all.rp_filter=1
net.ipv4.icmp_echo_ignore_broadcasts=1
# ipv6 settings (no autoconfiguration)
net.ipv6.conf.default.autoconf=0
net.ipv6.conf.default.accept_dad=0
net.ipv6.conf.default.accept_ra=0
net.ipv6.conf.default.accept_ra_defrtr=0
net.ipv6.conf.default.accept_ra_rtr_pref=0
net.ipv6.conf.default.accept_ra_pinfo=0
net.ipv6.conf.default.accept_source_route=0
net.ipv6.conf.default.accept_redirects=0
net.ipv6.conf.default.forwarding=0
net.ipv6.conf.all.autoconf=0
net.ipv6.conf.all.accept_dad=0
net.ipv6.conf.all.accept_ra=0
net.ipv6.conf.all.accept_ra_defrtr=0
net.ipv6.conf.all.accept_ra_rtr_pref=0
net.ipv6.conf.all.accept_ra_pinfo=0
net.ipv6.conf.all.accept_source_route=0
net.ipv6.conf.all.accept_redirects=0
net.ipv6.conf.all.forwarding=0
I will only add
net.ipv4.tcp_syncookies = 1
Just in case, default Debian /etc/sysctl.conf is a text file with all extra settings commented. See here.
If you want to make changes, you have two options:
- First method (recommended): create a file /etc/sysctl.d/local.conf and reboot
- Alternative method: make direct changes to
/etc/sysctl.conf and activate them with
sysctl
-p
(without reboot.)
The contents of /etc/sysctl.d/local.conf should be:
# Turn on Source Address Verification in all interfaces to
# prevent some spoofing attacks
#net.ipv4.conf.default.rp_filter=1
net.ipv4.conf.all.rp_filter=1

# ADD THE LINE
# ignore echo broadcast requests to prevent being part of smurf attacks
net.ipv4.icmp_echo_ignore_broadcasts=1

# Uncomment the next line to enable TCP/IP SYN cookies
# See http://lwn.net/Articles/277146/
# Note: This may impact IPv6 TCP sessions too
#net.ipv4.tcp_syncookies=1
net.ipv4.tcp_syncookies=1

# ipv6 settings (no autoconfiguration)
net.ipv6.conf.default.autoconf=0
net.ipv6.conf.default.accept_dad=0
net.ipv6.conf.default.accept_ra=0
net.ipv6.conf.default.accept_ra_defrtr=0
net.ipv6.conf.default.accept_ra_rtr_pref=0
net.ipv6.conf.default.accept_ra_pinfo=0
net.ipv6.conf.default.accept_source_route=0
net.ipv6.conf.default.accept_redirects=0
net.ipv6.conf.default.forwarding=0
net.ipv6.conf.all.autoconf=0
net.ipv6.conf.all.accept_dad=0
net.ipv6.conf.all.accept_ra=0
net.ipv6.conf.all.accept_ra_defrtr=0
net.ipv6.conf.all.accept_ra_rtr_pref=0
net.ipv6.conf.all.accept_ra_pinfo=0
net.ipv6.conf.all.accept_source_route=0
net.ipv6.conf.all.accept_redirects=0
net.ipv6.conf.all.forwarding=0
Install exim4 MTA
Using apt-get:
apt-get install exim4
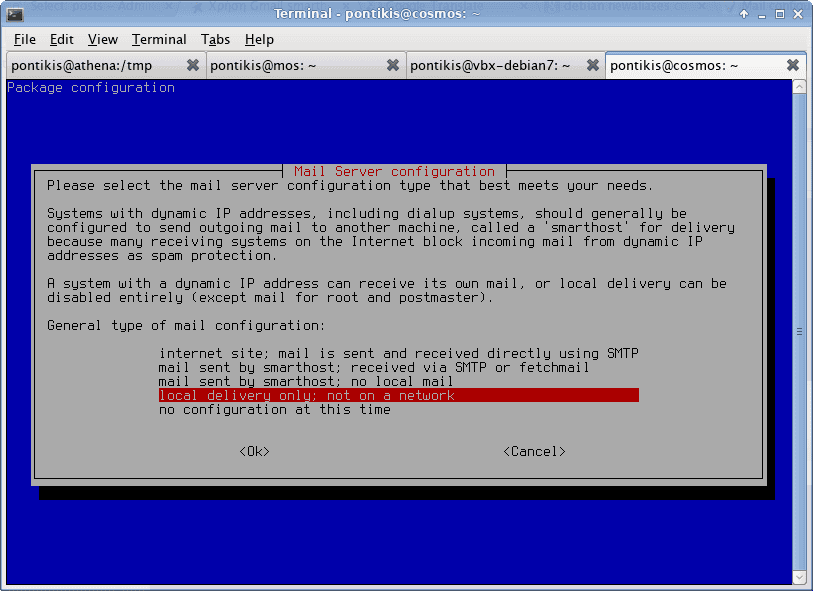
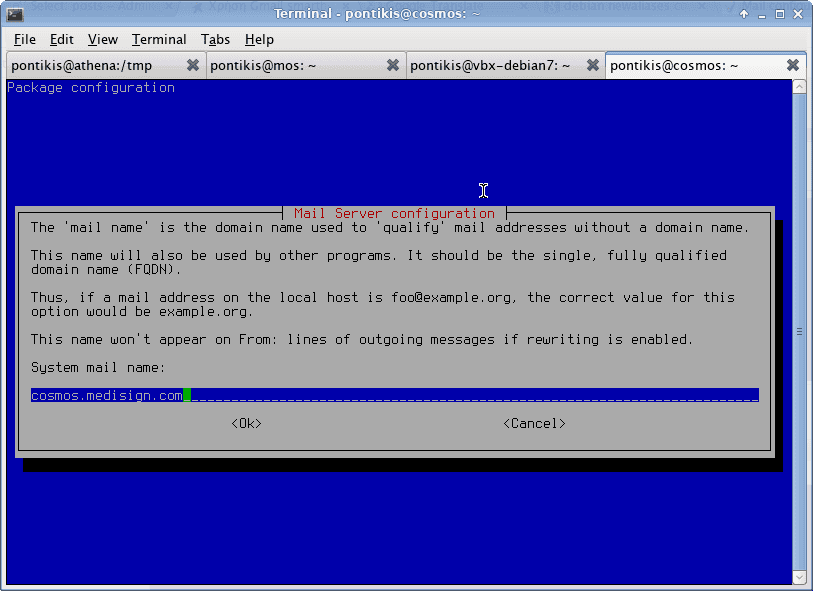
Configure exim
dpkg-reconfigure exim4-config
Change default option “local delivery only” to “internet site”
Set system mail name: (cosmos.medisign.com in my case)
Accept the default settings in the remaining steps.
Forward root mail
It is important as various software and services send mail to inform root for results or errors (cron for example).
nano /etc/aliases
...
root:pontikis@gmail.com
Then, rebuild aliases:
newaliases
iptables firewall
Using webmin
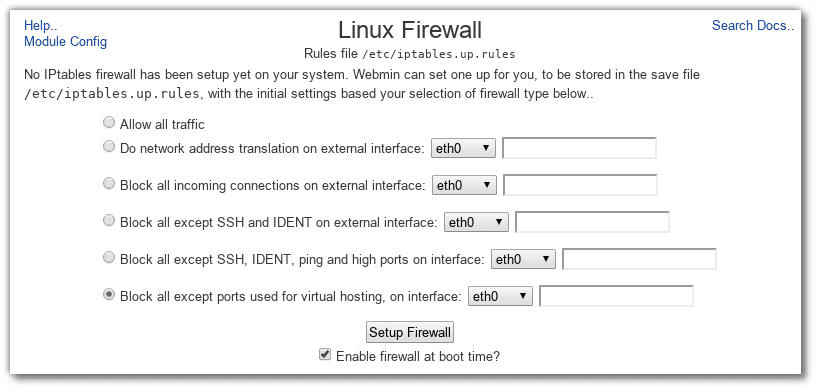
or using command line
nano /etc/iptables-up.rules
this is just an example with the most common rules
# Generated by iptables-save v1.4.14 on Fri May 17 20:09:12 2013
*filter
:INPUT DROP [0:0]
:FORWARD ACCEPT [0:0]
:OUTPUT ACCEPT [189:103951]
-A INPUT ! -i eth0 -j ACCEPT
-A INPUT -p tcp -m tcp --tcp-flags ACK ACK -j ACCEPT
-A INPUT -m state --state ESTABLISHED -j ACCEPT
-A INPUT -m state --state RELATED -j ACCEPT
-A INPUT -p udp -m udp --sport 53 --dport 1024:65535 -j ACCEPT
-A INPUT -p icmp -m icmp --icmp-type 0 -j ACCEPT
-A INPUT -p icmp -m icmp --icmp-type 3 -j ACCEPT
-A INPUT -p icmp -m icmp --icmp-type 4 -j ACCEPT
-A INPUT -p icmp -m icmp --icmp-type 11 -j ACCEPT
-A INPUT -p icmp -m icmp --icmp-type 12 -j ACCEPT
-A INPUT -p tcp -m tcp --dport 22 -j ACCEPT
-A INPUT -p tcp -m tcp --dport 113 -j ACCEPT
-A INPUT -p icmp -m icmp --icmp-type 8 -j ACCEPT
-A INPUT -p tcp -m tcp --dport 80 -j ACCEPT
-A INPUT -p tcp -m tcp --dport 443 -j ACCEPT
-A INPUT -p tcp -m tcp -m multiport --dports 25,587 -j ACCEPT
-A INPUT -p tcp -m tcp --dport 10000:10010 -j ACCEPT
-A INPUT -j LOG
-A FORWARD -j LOG
COMMIT
# Completed on Fri May 17 20:09:12 2013
# Generated by iptables-save v1.4.14 on Fri May 17 20:09:12 2013
*mangle
:PREROUTING ACCEPT [49770:4531554]
:INPUT ACCEPT [49770:4531554]
:FORWARD ACCEPT [0:0]
:OUTPUT ACCEPT [48931:39133213]
:POSTROUTING ACCEPT [48931:39133213]
COMMIT
# Completed on Fri May 17 20:09:12 2013
# Generated by iptables-save v1.4.14 on Fri May 17 20:09:12 2013
*nat
:PREROUTING ACCEPT [4223:278291]
:INPUT ACCEPT [1650:94585]
:OUTPUT ACCEPT [2836:192019]
:POSTROUTING ACCEPT [2836:192019]
COMMIT
# Completed on Fri May 17 20:09:12 2013
REMARK: rules -A INPUT -j LOG and -A FORWARD -j LOG force iptables to keep log and needed if psad is used. See details in this post.
To load these rules to iptables firewall:
iptables-restore < /etc/iptables.up.rules
To save iptables firewall active rules:
iptables-save > /etc/iptables.up.rules
To load these rules on startup:
nano /etc/network/interfaces
add to eth0 interface
...
post-up iptables-restore < /etc/iptables.up.rules
MySQL community database server
Using apt-get:
apt-get install mysql-server
After installation, run:
mysql_secure_installation
mysql_secure_installation sets a root password (if not exists), removes anonymous users, disables non-local root access, removes the test database and access rules related to it and finally reloads privileges.
REMARK: restart MySQL using systemctl restart
mysql.service
Install Apache web server
Using apt-get:
apt-get install apache2 apache2-mpm-prefork
Enable mod_rewrite and mod_deflate (gzip compression)
a2enmod rewrite
a2enmod deflate
Config virtual hosts (settings may vary according to your needs)
nano /etc/apache2/ports.conf
Add your IP
NameVirtualHost 144.76.70.100:80
Create virtual hosts. This is just an example:
nano /etc/apache2/sites-available/www.pontikis.net
<VirtualHost 144.76.70.100:80>
        ServerName  www.pontikis.net
        ServerAdmin christos@pontikis.net
        DocumentRoot /var/www/pontikis.net

        <Directory /var/www/pontikis.net>
                Options FollowSymLinks MultiViews
                AllowOverride All
                Order allow,deny
                allow from all
        </Directory>

        ErrorLog ${APACHE_LOG_DIR}/pontikis.net_error.log
        LogLevel warn
        CustomLog ${APACHE_LOG_DIR}/pontikis.net_access.log combined

        ErrorDocument 404 /404/

        SetOutputFilter DEFLATE
        SetEnvIfNoCase Request_URI .(?:gif|jpe?g|ico|png)$  no-gzip dont-vary
        SetEnvIfNoCase Request_URI .(?:exe|t?gz|zip|bz2|sit|rar)$ no-gzip dont-vary
        SetEnvIfNoCase Request_URI .pdf$ no-gzip dont-vary

        BrowserMatch ^Mozilla/4 gzip-only-text/html
        BrowserMatch ^Mozilla/4.0[678] no-gzip
        BrowserMatch bMSIE !no-gzip !gzip-only-text/html

</VirtualHost>
Enable site
a2ensite www.pontikis.net
Restart Apache
systemctl restart apache2.service
Awstats log analyzer
Using apt-get:
apt-get install awstats
Details in a future post soon.
php
Using apt-get:
apt-get install php5
Enable php error log. Log file must be writable from Apache. So:
mkdir /var/log/php
chown www-data /var/log/php
Edit php.ini
nano /etc/php5/apache2/php.ini
uncomment ;error_log:
error_log = /var/log/php/php_errors.log
Remember to rotate /var/log/php/php_errors.log:
nano /etc/logrotate.d/php
add the following:
/var/log/php/php_errors.log {
        weekly
        missingok
        rotate 4
        notifempty
        create
}
Install MySQL Native Driver (mysqlnd)
apt-get install php5-mysqlnd
REMARK: If, for any reason, you don’t want mysqlnd,
try apt-get install php5-mysql instead.
Install php adodb extension.
apt-get install php5-adodb
Install php GD library
apt-get install php5-gd
Config mbstring
nano /etc/php5/conf.d/mbstring-settings.ini
[mbstring]
mbstring.language = English
mbstring.internal_encoding = UTF-8
mbstring.encoding_translation = On
mbstring.http_input = UTF-8,SJIS,EUC-JP
mbstring.http_output = UTF-8
mbstring.detect_order = UTF-8,ASCII,JIS,SJIS,EUC-JP
mbstring.substitute_character = none
mbstring.func_overload = 0
Harden PHP setup (settings may vary according to your needs)
nano /etc/php5/conf.d/security.ini
allow_url_include = Off
allow_url_fopen = Off
session.use_only_cookies = 1
session.cookie_httponly = 1
expose_php = Off
display_errors = Off
register_globals = Off
disable_functions = escapeshellarg, escapeshellcmd,passthru, proc_close, proc_get_status, proc_nice, proc_open,proc_terminate
Restart Apache
systemctl restart apache2.service
Install memcached
Using apt-get:
apt-get install memcached php5-memcached
systemctl restart apache2.service
Install phpMemcachedAdmin (optional):
mkdir /var/www/phpMemcachedAdmin
cd /var/www/phpMemcachedAdmin
wget http://phpmemcacheadmin.googlecode.com/files/phpMemcachedAdmin-1.2.2-r262.tar.gz
tar -xvzf phpMemcachedAdmin-1.2.2-r262.tar.gz
chmod +r *
chmod 0777 Config/Memcache.php
You may want to restrict access to this directory using .htaccess
Install Alternative PHP Cache (APC)
Using apt-get:
apt-get install php-apc
Edit configuration (optional)
nano /etc/php5/conf.d/20-apc.ini
After extension=apc.so, add the following (modify them according to your needs)
extension=apc.so

apc.enabled=1
apc.shm_size=128M
apc.ttl=3600
apc.user_ttl=7200
apc.gc_ttl=3600
apc.max_file_size=1M
Restart Apache
systemctl restart apache2.service
Install database manager
phpMyAdmin and adminer are popular. I prefer adminer:
mkdir /var/www/adminer
wget http://downloads.sourceforge.net/adminer/adminer-3.6.4-mysql-en.php
You may want to restrict access to this directory using .htaccess
Install git
Using apt-get:
apt-get install git
Install s3cmd for Amazon backup
Using apt-get:
apt-get install s3cmd
REMARK: There is a serious BUG with current Debian version of s3cmd (1.1.0-beta3) in multipart uploads to Amazon S3 (mainly using cron). Some changes must be done to /usr/share/s3cmd/S3/S3.py. The patch is available here.
Configure s3cmd with your Amazon credentials
cd /root
s3cmd --configure
Various tools
Using apt-get:
apt-get install mc p7zip-full htop sysstat
Deploy Projects
I use git and Github to deploy my projects (either public or private). For example to deploy my blog in the new server:
chown -R pontikis:pontikis /var/www
cd /var/www
git clone git@github.com:pontikis/pontikis.net.git
Furthermore, to update this project in the future:
cd /var/www/pontikis.net
git fetch
git merge origin/master
User pontikis public rsa key must be added to github. Details here.
Backup software
There are many backup solutions available. I use bash-cloud-backup.
bash-cloud-backup is a set of bash scripts, which can be used to automate local and cloud backup in Linux/Unix machines. I use Amazon S3 as cloud backup solution.
Simple system monitoring tools
Get email notifications for updates
apt-get install apticron
apt-get install update-notifier-common
apt-get install debian-goodies
More details in this post.
Logwatch
Logwatch is a customizable log analysis system. Logwatch parses through your system’s logs and creates a report analyzing areas that you specify.
Using apt-get:
apt-get install logwatch
Configuration:
mkdir /var/cache/logwatch
cp /usr/share/logwatch/default.conf/logwatch.conf /etc/logwatch/conf/
nano /etc/logwatch/conf/logwatch.conf
#Output = stdout
Output = mail
Simple intrusion detection techniques
rkhunter
apt-get install rkhunter
Simple intrusion prevention techniques
fail2ban
fail2ban scans log files and bans IPs that show the malicious signs, for example too many password failures, seeking for exploits, etc.
apt-get install fail2ban
Find details in this post.
psad
psad analyze iptables log messages to detect port scans and other suspicious traffic.
apt-get install psad
Find details in this post.
Security and system auditing tool
Install Lynis using apt-get:
apt-get install lynis
Perform system check:
lynis -c
Perform (again) a full system update
Using apt-get:
apt-get update && apt-get -V upgrade
Update files database (again)
Use:
updatedb
Entrepreneur | Full-stack developer | Founder of MediSign Ltd. I have over 15 years of professional experience designing and developing web applications. I am also very experienced in managing (web) projects.