
Debian 8.0 Jessie was initially released on April 26th, 2015. Jessie is powered by Linux kernel 3.16. Jessie ships with a new default init system, systemd. The sysvinit init system is still available in Jessie. The UEFI (Unified Extensible Firmware Interface) support introduced in Wheezy has also been greatly improved in Jessie. More information here.
In this post I describe a dedicated server setup, using Debian Jessie. It is a Hetzner EX40 dedicated server with IP 144.76.225.175. My blog, my company website and some other web projects will be hosted in this server.
I use DnsMadeEasy for all my DNS needs. I use No IP for email forwarding to Gmail. So I will not setup bind name server or a full blown mail server. Default Debian MTA (exim4) is enough for the server to send emails.
I selected a minimal Debian amd64 server (basic Debian system and SSH). Thanks to Hetzner staff, the server was up and running in less than 10 minutes. As usual, they sent me the IP and root password. Below I describe the whole procedure after this point.
Connect using SSH
This is the first and should be the last time you are remotely connected with the server as root:
ssh 144.76.225.175 -l root
Change root password
Use:
passwd
Perform a full system update
Using apt-get:
apt-get update && apt-get -V upgrade
Update files database
Install the packages (if not installed):
apt-get install locate mlocate
then
updatedb
Create common user
Here I create a common user with username pontikis.
You can use adduser srcipt
adduser pontikis
Adding user `pontikis' ...
Adding new group `pontikis' (1001) ...
Adding new user `pontikis' (1001) with group `pontikis' ...
Creating home directory `/home/pontikis' ...
Copying files from `/etc/skel' ...
Enter new UNIX password:
Retype new UNIX password:
passwd: password updated successfully
Changing the user information for pontikis
Enter the new value, or press ENTER for the default
        Full Name []: Christos Pontikis
        Room Number []:
        Work Phone []:
        Home Phone []:
        Other []:
Is the information correct? [Y/n] y
or the original linux commands
groupadd pontikis
useradd -m -g pontikis -s /bin/bash pontikis
passwd pontikis
Harden SSH
Edit SSH configuration:
nano /etc/ssh/sshd_config
Make the following changes
...
PermitRootLogin no
...
X11Forwarding no
...
AllowUsers pontikis ...
...
Restart SSH
systemctl restart ssh.service
SSH key based authentication
First, generate a new SSH key
cd ~/.ssh
ssh-keygen -t rsa -b 4096 -C "your_email_here"
To connect from workstation to server machine, add your public key to server.
ssh-copy-id -i ~/.ssh/id_rsa.pub 144.76.225.175
Color Bash Prompt
To add color to bash prompt, you can follow this guide, where a global solution is provided (recommended).
As an alternative:
To add color to common user prompt:
cd /home/pontikis
nano .bashrc
uncomment #force_color_prompt=yes
...
force_color_prompt=yes
...
To add red color to root prompt:
cd /root
nano .bashrc
Set PS1 as follows:
PS1='${debian_chroot:+($debian_chroot)}[�33[01;31m]u@h[�33[00m]:[�33[01;34m]w[�33[00m]$ '
Also, find # You may uncomment the following lines if you want `ls’ to be colorized: and uncomment the following lines
To see the changes you have to logoff and login again, or go to home and give
. .bashrc
Set default text editor
nano in my case:
update-alternatives --config editor
result:
There are 4 choices for the alternative editor (providing /usr/bin/editor).

  Selection    Path                Priority   Status
------------------------------------------------------------
* 0            /bin/nano            40        auto mode
  1            /bin/nano            40        manual mode
  2            /usr/bin/mcedit      25        manual mode
  3            /usr/bin/vim.basic   30        manual mode
  4            /usr/bin/vim.tiny    10        manual mode

Press <enter> to keep the current choice[*], or type selection number:
Customize nano text editor
To dislpay line numbers, uncomment # set const
nano /etc/nanorc
# set const
set const
Install ntp (Network Time Protocol)
Using apt-get
apt-get install ntp
Change hostname
Using systemd
Systemd ships a growing number of useful, unified command-line interfaces for system settings and control (timedatectl, bootctl, hostnamectl, loginctl, machinectl, kernel-install, localectl). In Debian, they use the existing configuration files without breaking compatibility. Using systemd is easy to change hostname
hostnamectl set-hostname your.hostname.here
The old way (not recommended)
Add the hostname to /etc/hostname and /etc/hosts so local address(es) resolves with the new system name and reboot.
Set server timezone
Using dpkg
dpkg-reconfigure tzdata
From http://wiki.debian.org/TimeZoneChanges
Restarting Daemons and Long-Running Programs After the zoneinfo files are updated, you may need to restart daemons and other long-running programs to get them to use the new zone information. Examples of such programs include apache, bind, cron, fetchmail -d, inetd, mailman, sendmail, and sysklogd. A common symptom of this problem is seeing incorrect timestamps mixed in with the correct timestamps in your log files (e.g. /var/log/syslog). Even interactive programs like “mutt” may continue to use the old timezone information until they are restarted.
For example, restart cron
systemctl restart cron.service
An easier way is to restart your system
reboot
REMARK: Server date and time settings are very important for services like Amazon S3 backup, OpenVPN, NFS etc, where “client” and “server” machines must have the same settings.
Install webmin
You have to know the original Linux commands to perform all administrative tasks from command line. However, a control panel makes things easier sometimes. Webmin is a free and Open Source control panel basically for Linux. Webmin is a very powerful tool, but I use it mainly for the following tasks:
- users management
- iptables firewall
- scheduled cron jobs
So, create a file like
nano /etc/apt/sources.d/webmin.lst
and add the following lines
deb http://download.webmin.com/download/repository sarge contrib
deb http://webmin.mirror.somersettechsolutions.co.uk/repository sarge contrib
Add apt key:
cd /root
wget http://www.webmin.com/jcameron-key.asc
apt-key add jcameron-key.asc
Finally
apt-get update
apt-get install webmin
It is also important to create a Webmin user (pontikis in my case), to avoid login to Webmin as root.
Harden kernel using /etc/sysctl.conf
It was a pleasant surprise to see that Hetzner default installation was included all important changes to /etc/sysctl.d/99-hetzner.conf:
### Hetzner Online GmbH installimage
# sysctl config
#net.ipv4.ip_forward=1
net.ipv4.conf.all.rp_filter=1
net.ipv4.icmp_echo_ignore_broadcasts=1
# ipv6 settings (no autoconfiguration)
net.ipv6.conf.default.autoconf=0
net.ipv6.conf.default.accept_dad=0
net.ipv6.conf.default.accept_ra=0
net.ipv6.conf.default.accept_ra_defrtr=0
net.ipv6.conf.default.accept_ra_rtr_pref=0
net.ipv6.conf.default.accept_ra_pinfo=0
net.ipv6.conf.default.accept_source_route=0
net.ipv6.conf.default.accept_redirects=0
net.ipv6.conf.default.forwarding=0
net.ipv6.conf.all.autoconf=0
net.ipv6.conf.all.accept_dad=0
net.ipv6.conf.all.accept_ra=0
net.ipv6.conf.all.accept_ra_defrtr=0
net.ipv6.conf.all.accept_ra_rtr_pref=0
net.ipv6.conf.all.accept_ra_pinfo=0
net.ipv6.conf.all.accept_source_route=0
net.ipv6.conf.all.accept_redirects=0
net.ipv6.conf.all.forwarding=0
You may add
net.ipv4.tcp_syncookies = 1
Disable IPv6 (optional)
net.ipv6.conf.all.disable_ipv6 = 1
net.ipv6.conf.default.disable_ipv6 = 1
net.ipv6.conf.lo.disable_ipv6 = 1
net.ipv6.conf.eth0.disable_ipv6 = 1
About sysctl.conf
Just in case, default Debian /etc/sysctl.conf is a text file with all extra settings commented. See here.
If you want to make changes, you have two options:
- First method (recommended): create a file /etc/sysctl.d/local.conf and reboot
- Alternative method: make direct changes to
/etc/sysctl.conf and activate them with
sysctl
-p
(without reboot.)
Install exim4 MTA
Using apt-get:
apt-get install exim4
Configure exim
dpkg-reconfigure exim4-config
Change default option “local delivery only” to “internet site”
Set system mail name: (your hostname here)
Accept the default settings in the remaining steps.
Exim4 errors after disabling IPv6
If exim4 local interfaces contain IPv6 settings and you disable IPv6 in your server, exim will throw this error
exim paniclog /var/log/exim4/paniclog on YOUR_SERVER has non-zero size, mail system might be broken. The last 10 lines are quoted below.

2015-09-11 17:33:13 socket bind() to port 25 for address ::1 failed: Cannot assign requested address: daemon abandoned
To fix this error
nano /etc/exim4/update-exim4.conf.conf
replace
dc_local_interfaces='127.0.0.1 ; ::1'
with
dc_local_interfaces='127.0.0.1'
then
rm /var/log/exim4/paniclog
systemctl reboot
Forward root mail
It is important as various software and services send mail to inform root for results or errors (cron for example).
nano /etc/aliases
...
root:pontikis@gmail.com
Then, rebuild aliases:
newaliases
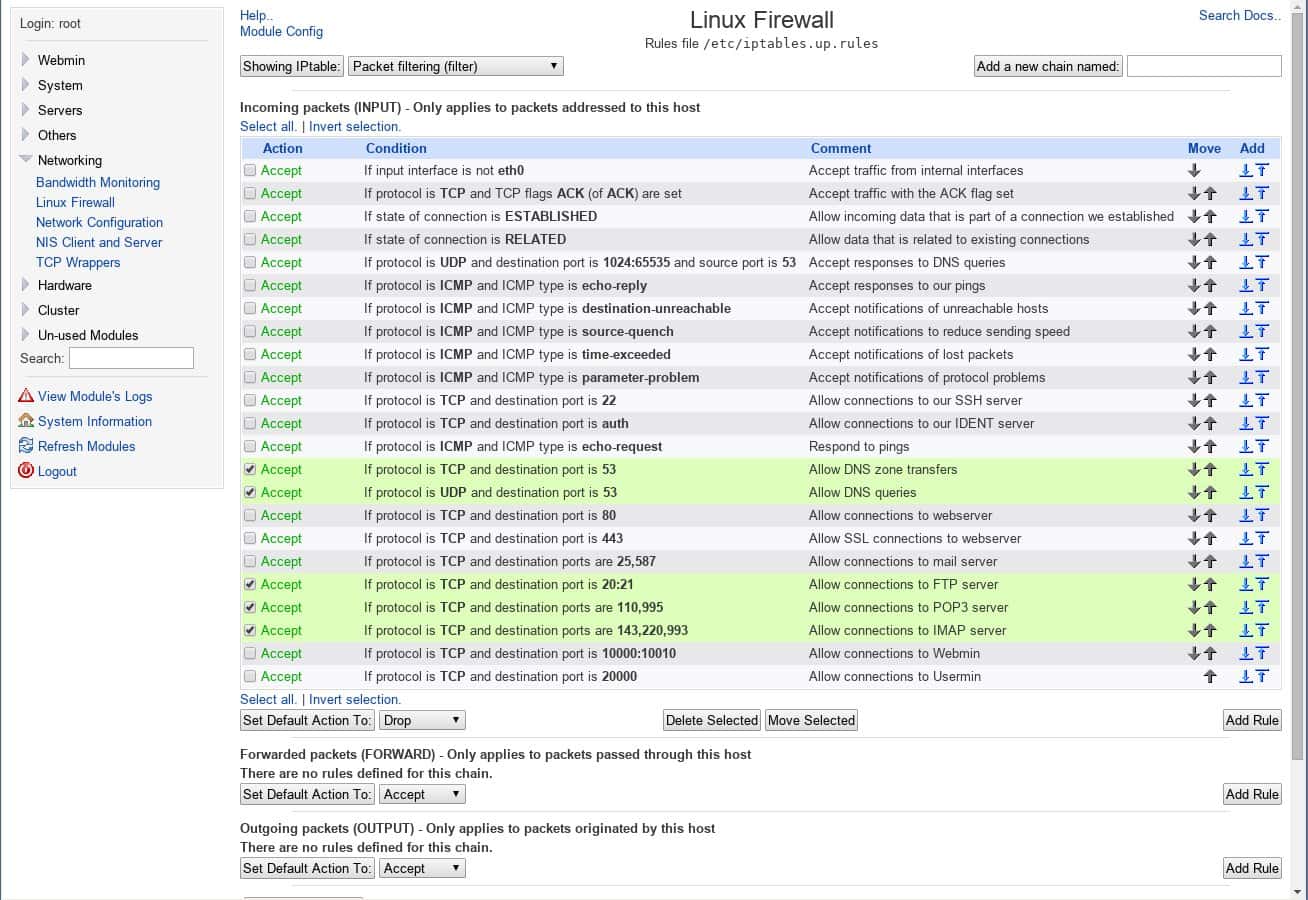
iptables firewall
Using webmin (the easy way)
Select the last option Block all except ports used for virtual hosting, on interface eth0 and press setup
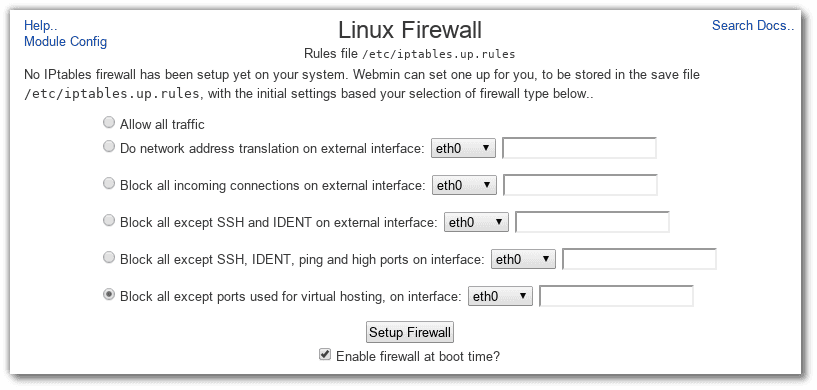
Then add or remove rules. In my case I removed DNS. FTP, POP3, IMAP rules (see the image)
MySQL community database server
Using apt-get:
apt-get install mysql-server
After installation, run:
mysql_secure_installation
mysql_secure_installation sets a root password (if not exists), removes anonymous users, disables non-local root access, removes the test database and access rules related to it and finally reloads privileges.
REMARK: restart MySQL using systemctl restart
mysql.service
Install Apache web server
Important changes with Apache 2.4
Debian Jessie ships with Apache 2.4 There are some important changes with this version, which could break your current configuration. For example
- Since Apache 2.4, each virtual host file should have the .conf extension
- Either all Options must start with + or -, or no Option may
- Directives Order allow,deny and allow from all are deprecated. Use Require all granted instead.
See all changes in details here.
Check your configuration using
apachectl configtest
Basic installation
apt-get install apache2 apache2-mpm-prefork
Apache modules
mod_deflate is already enabled (see more details at Speed up your website with gzip compression)
Enable the modules you need. In my case
a2enmod rewrite
Create your own virtual hosts. This is just an example (with gzip compression):
nano /etc/apache2/sites-available/www.pontikis.net.conf
<VirtualHost 144.76.225.175:80>
        ServerName  www.pontikis.net
        ServerAdmin christos@pontikis.net

        DocumentRoot /var/www/html/pontikis.net

        <Directory /var/www/html/pontikis.net>
                        Options -Indexes +FollowSymLinks +MultiViews
                        AllowOverride All
                        Require all granted
        </Directory>

        ErrorLog ${APACHE_LOG_DIR}/pontikis.net_error.log

        # Possible values include: debug, info, notice, warn, error, crit,
        # alert, emerg.
        LogLevel warn

        CustomLog ${APACHE_LOG_DIR}/pontikis.net_access.log combined

        ErrorDocument 404 /404/

        SetOutputFilter DEFLATE
        SetEnvIfNoCase Request_URI .(?:gif|jpe?g|ico|png)$  no-gzip dont-vary
        SetEnvIfNoCase Request_URI .(?:exe|t?gz|zip|bz2|sit|rar)$ no-gzip dont-vary
        SetEnvIfNoCase Request_URI .pdf$ no-gzip dont-vary

        BrowserMatch ^Mozilla/4 gzip-only-text/html
        BrowserMatch ^Mozilla/4.0[678] no-gzip
        BrowserMatch bMSIE !no-gzip !gzip-only-text/html
</VirtualHost>
Redirect URL withour www to main site:
nano /etc/apache2/sites-available/pontikis.net.conf
<VirtualHost 144.76.225.175:80>
        ServerName pontikis.net
        Redirect / http://www.pontikis.net/
</VirtualHost>
Enable site
a2ensite www.pontikis.net.conf
a2ensite pontikis.net.conf
Restart Apache
systemctl restart apache2.service
php
Basic installation
Using apt-get:
apt-get install php5
Error log
Enable php error log. Log file must be writable from Apache. So:
mkdir /var/log/php
chown www-data /var/log/php
Edit php.ini
nano /etc/php5/apache2/php.ini
uncomment ;error_log:
error_log = /var/log/php/php_errors.log
Remember to rotate /var/log/php/php_errors.log:
nano /etc/logrotate.d/php
add the following:
/var/log/php/php_errors.log {
        weekly
        missingok
        rotate 4
        notifempty
        create
}
Php extensions
Install MySQL Native Driver (mysqlnd)
apt-get install php5-mysqlnd
REMARK: If, for any reason, you don’t want mysqlnd,
try apt-get install php5-mysql instead.
Othyer php extensions you may need. In my case
apt-get install php5-gd
apt-get install php5-curl
Config mbstring
Create a file
nano /etc/php5/apache2/conf.d/98_mbstring-settings.ini
with contents
[mbstring]
mbstring.language = English
mbstring.encoding_translation = On
mbstring.detect_order = UTF-8,ASCII,JIS,SJIS,EUC-JP
mbstring.substitute_character = none
mbstring.func_overload = 0
Harden php
Create a file
nano /etc/php5/apache2/conf.d/99_security.ini
with contents
allow_url_include = Off
allow_url_fopen = Off
session.use_only_cookies = 1
session.cookie_httponly = 1
expose_php = Off
display_errors = Off
register_globals = Off
disable_functions = shell_exec, escapeshellarg, escapeshellcmd, passthru, proc_close, proc_get_status, proc_nice, proc_open,proc_terminate
(settings may vary according to your needs).
Restart Apache
systemctl restart apache2.service
Check installed extensions
php -m
Install memcached (optional)
Using apt-get:
apt-get install memcached php5-memcached
systemctl restart apache2.service
Install phpMemcachedAdmin (optional):
mkdir /var/www/html/path/to/phpMemcachedAdmin
cd /var/www/html/path/to/phpMemcachedAdmin
wget http://phpmemcacheadmin.googlecode.com/files/phpMemcachedAdmin-1.2.2-r262.tar.gz
tar -xvzf phpMemcachedAdmin-1.2.2-r262.tar.gz
chmod +r *
chmod 0777 Config/Memcache.php
Please note that /path/to is a pseudo path. Use your own path.
You may want to restrict access to this directory using .htaccess Here is how:
cd /var/www/html/path/to/phpMemcachedAdmin
nano .htaccess
add
AuthType Basic
AuthName "pontikis.net Admin area"
AuthUserFile /etc/htsecure/pontikis.net/.htpasswd
Require valid-user
Add users
mkdir -p /etc/htsecure/pontikis.net
htpasswd -c /etc/htsecure/pontikis.net/.htpasswd pontikis
Restart Apache
systemctl restart apache2.service
Install database manager (optional)
phpMyAdmin and adminer are popular. I prefer adminer:
You may use apt-get install adminer, but I prefer to download the latest package
mkdir /var/www/html/path/to/adminer
cd /var/www/html/path/to/adminer
wget http://downloads.sourceforge.net/adminer/adminer-4.2.2-mysql-en.php
Please note that /path/to is a pseudo path. Use your own path.
You may want to restrict access to this directory using .htaccess (see previous paragraph)
Install git (optional)
Using apt-get:
apt-get install git
Display basic configuration
git config --list
Set basic settings
git config --global user.name 'Your Name'
git config --global user.email you@example.com
git config --global core.editor "nano"
Configure Git to properly handle line endings:
git config --global core.autocrlf input
Install s3cmd for Amazon backup (optional)
Using apt-get:
apt-get install s3cmd
Configure s3cmd with your Amazon credentials
cd /root
s3cmd --configure
Various tools (optional)
Using apt-get:
apt-get install mc p7zip-full htop
Wipe is useful to secure delete files.
apt-get install wipe
Deploy Projects
I use git and Github to deploy my projects (either public or private). For example to deploy my blog in the new server:
chown -R pontikis:pontikis /var/www/html
cd /var/www/html
git clone git@github.com:pontikis/pontikis.net.git
Furthermore, to update this project in the future:
cd /var/www/html/pontikis.net
git fetch
git merge origin/master
User pontikis public rsa key must be added to github. Details here.
Backup software
There are many backup solutions available. I use (my own solution) bash-cloud-backup.
bash-cloud-backup is a set of bash scripts, which can be used to automate local and cloud backup in Linux/Unix machines. I use Amazon S3 as cloud backup solution.
Simple system monitoring tools
Get email notifications for updates
Install apticron to get email notifications for updates
apt-get install apticron
Check which services need restart after an update
apt-get install debian-goodies
then use
checkrestart
To check if reboot needed after a system update
Check if /var/run/reboot-required or /var/run/reboot-required.pkgs files existed
Example
cat /var/run/reboot-required
*** System restart required ***
cat /var/run/reboot-required.pkgs
linux-base
More details in this post.
IMPORTANT UPDATE (2016)
Since Debian Jessie (and latest Ubuntu versions of course), the package
needrestartwill do all the job nice and easy:Setup needrestart
apt-get install needrestartREAD DETAILS in this post: When to Restart Services or Reboot after Update on Debian or Ubuntu
Load average monitor
If you are not familiar with load average in Linux/UNIX please read Understanding Linux CPU Load – when should you be worried?
As root, create a script like
mkdir -p /root/scripts/loadavg
cd /root/scripts/loadavg
touch loadavg.sh
chmod 700 loadavg.sh
nano loadavg.sh
with contents
#!/bin/bash
trigger=4.00
load=`/bin/cat /proc/loadavg | /usr/bin/awk '{print $1}'`
response=`echo | /usr/bin/awk -v T=$trigger -v L=$load 'BEGIN{if ( L > T){ print "greater"}}'`
if [[ $response = "greater" ]]
then
echo $load | /usr/bin/mail -s"High load on YOUR SERVER NAME - [ $load ]" YOUR_EMAIL_HERE
fi
(take care to set the right paths for cat, awk, mail commands).
How to set the correct value to trigger variable? Get the number of CPUs/cores:
grep -c ^processor /proc/cpuinfo
To be more safe, divide this number with 2. This is the value of trigger variable, you have to put in the above script (4 in my case).
Cron automation
Add a cron job (as root) to run the script every 3 minutes
crontab -e
The above command will use vim text editor. If you use nano (as me):
export VISUAL=nano; crontab -e
Then add the following
0,3,6,9,12,15,18,21,24,27,30,33,36,39,42,45,48,51,54,57 * * * * /root/scripts/loadavg/loadavg.sh #Load Average monitor
or use Wembin to add the cron job (recommended).
There are many bash scriupts available. Just use Google. Some examples: example1 | example2
Uptime monitor (optional)
I use the Uptime robot service to monitor my servers. Uptime robot will notify me, when server is down.
Simple intrusion detection techniques (optional)
rkhunter
apt-get install rkhunter
Perform (again) a full system update
Using apt-get:
apt-get update && apt-get -V upgrade
Update files database (again)
Use:
updatedb
Entrepreneur | Full-stack developer | Founder of MediSign Ltd. I have over 15 years of professional experience designing and developing web applications. I am also very experienced in managing (web) projects.